Please support Game Informer. Print magazine subscriptions are less than $2 per issue
Blood, Sweat, And Fears - Surviving My First PC Build

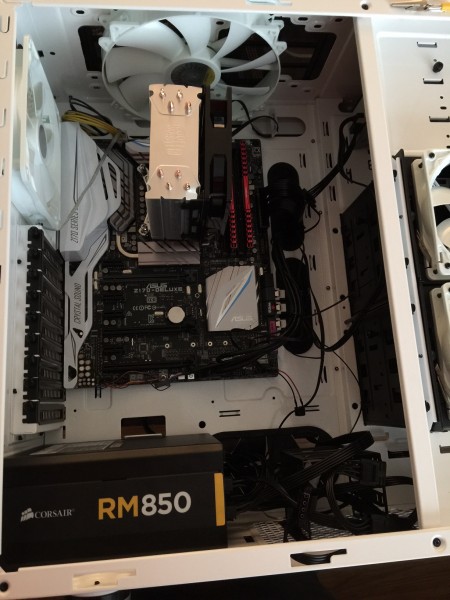
Over the weekend, I put together my first PC. I have been researching for months, trying to figure out whether I was going to build or buy. Ultimately, I decided to take the plunge.
Building my own computer wasn’t painless. Don’t let anyone shame you if you express trepidation about the process. There’s a lot that can go wrong, but it feels pretty darn good when you get to the end.
I’m sharing my story in hopes that it offers some wisdom or comfort to those taking on the challenge for the first time.
Building your own PC takes time, carries some risk, and can be a frustrating experience. But for the same end results, you could end up saving $1,000 or more by sourcing your own components and carving out time to assemble.
Knowing where to start is important. I strongly encourage you to pick a budget and then spend your planning time using PC Part Picker, a website that aggregates pricing from popular retailers and also checks to make sure your parts are all compatible.
This ensures that you won’t end up with a processor that doesn’t fit your motherboard and a video card that isn’t compatible with either. The last thing you want is to have all the pieces in hand only to find out they don’t work in harmony.
There are also some minor expenses you’ll want to incur to protect your investment. Purchase a grounding bracelet that you can attach to your case. You don’t want a static discharge to fry your components. Also, spend the money on a computer toolkit. This should give you more than you need get everything where it needs to go.
Despite preparing accordingly, my first PC build had some nightmare moments. My hope is that you’ll be able to learn from my experience if you decide to build instead of purchase a computer for VR (or anything else).
Getting Started
Once you have all your parts, go through your checklist one more time. Make sure you really do have all your shipments and aren’t missing a crucial component.
Assuming you have everything, you’re ready to begin. At this point, your case manual is going to be extremely useful.
Provided the documentation is well-organized, you should be able to get your power supply installed with relative ease. When you open your power supply box, you’ll find inside a number of power cables.
Some include multiple connectors in sequence. As you might expect from this, daisy chaining devices along a single power cord is completely acceptable (both my solid state drive and mechanical hard drive are on the same power cable). This will keep things tidy in your case.
Contemporary cases typically include cable ports to thread things along one side and out of the main housing. My case also includes a window, so making sure that things look neat was a priority for me. You can prepare with either traditional plastic, single-use cable ties or velcro ties.
After your power supply is in, you’ll need to tackle the trickiest part of the entire process. Your case manual might suggest that you put the motherboard in next. STOP. Do not listen to it. Tell it I said so and to stop giving you bad advice.
Before you seat your motherboard in the case, you’ll want to do as much as you can with it first. This includes seating your memory sticks. Read your motherboard manual, it is your new god (until it leaves out crucial details, which it probably will).
It will teach you how to place your processor correctly in the board. You’ll also want to affix your processor cooler (typically a fan) to the processor using thermal compound. If you purchased an aftermarket cooler (as I did), you’ll want to carefully read that manual, too.
This part of the process required four sets of instructions. It was cumbersome, and I was terrified that in applying the sticky, silver thermal compound to the processor and placing the huge cooler onto it that I would mess it up.
I eventually got the standoffs into the case (tiny metal screws that you, in turn, screw the motherboard into so it isn’t resting right on the case wall), put the input/output shielding that covers and identifies the ports in, and carefully lowered the board into place, tightening it down.
I believed that this was going to be the most difficult part of the build. I thought I was home free as I easily slotted my two storage drives into the bays. I was wrong, and I started to panic.
Things Will Go Wrong, But Stay Calm
After I got the motherboard and the drives in, I needed to start wiring things up. This can be overwhelming, as you’ll be confronted with a great deal of options, some of which you won’t actually use. A red herring like that actually cost me hours of stress later on.
The important thing is that you take some time to study included diagrams. Identify the the different, often well-labeled segments of the motherboard, and plan ahead.
Chances are that when you opened your case for the first time, you were greeted by a bundle of wires. My reaction was similar to Indiana Jones’ when confronted by asps (very deadly). I believe I uttered something along the lines of, “Oh jeez. What have I gotten myself into?”
Once you have your motherboard in place and your storage and optical drives seated, start with those. Each of these will likely take a power cable (fitting over the larger of the two plastic pieces) and a data cable (fitting over the smaller). Find the power cable that matches up, often with multiple connectors for the daisy chaining I mentioned earlier.
Your motherboard manual will tell you where to plug these in, and which of the many similarly shaped ports to use. I was lucky and my board had a clear label for my “OS Drive” (which I knew was where I wanted my solid state to plug in). After that, it was a simple process of reading and plugging.
My case also has forward facing USB ports, audio, and LEDS. each of these were well labeled on both the board diagram and the plugs. One step that wasn’t entirely clear is how to power the motherboard. It’s here I ran into my first major hurdle.
One of my friends told me right before I started building that there was a 50/50 chance that my PC wouldn’t power the first time I tried. Mine did not, and I didn’t take the advice I offer you now.
Yes, the parts are expensive. Yes, it’s easy to worry you’ve damaged something. No, it does not help. Neither does slicing your hand open on a component. Trust me on that.
Remain calm and troubleshoot methodically. Thankfully, I had a friend who saw me tweeting about my struggles. He stepped in to help and kept me from ending up on the floor in the fetal position.
I had everything in place except my video card (which hadn’t arrived yet). Thankfully, due to onboard video, I knew I could get almost all the way there, test the build, and be ready to drop in the high-powered component.
Everything appeared to be in place. My motherboard LEDs were lit. I pressed the power button on the case and got no feedback except a single click from the power supply as my rear fan shifted slightly. The power button directly on the motherboard offered the same anemic response.
I sat there for about 30 minutes flipping the switch on the power supply off and on, pressing the power button, and listening to that hollow click. It was maddening, as each time I expected to see the components spring to life.
It was at this point I learned two things. First, panicking leads to wasted time and energy. Second, documentation for computer parts is absolutely atrocious.
We ended up having to test the power supply by sticking a paper clip into two specific ports in the power supply. It sounds terrifying, and you might think that I was due a healthy shock. However, the manufacturer recommends testing the supply with a single fan connected to ensure that the unit is functional.
It was, and we were able to move on to trying something else. I ended up removing the motherboard entirely, connecting all of the cables to it outside of the case, and trying one more time. I don’t know that I’ve ever felt relief like I did when every fan jumped to life.
I reseated the motherboard, reconnected all of the cables (including the second power connector that the manual conveniently forgot to mention), stood it up, and plugged it in. I connected an HDMI cable to the television and watched it report back both storage drives and my optical drive. Everything was working and I went to bed at 4:30 a.m. thinking that it was going to be smooth sailing from here on out.
Oh, Mike. You fool.

More Things Might Go Wrong After They Go Right
When I got up the next morning, I wanted to push ahead with getting as much ready as possible. It was a simple matter to install Windows 10 (it only took about 10 minutes).
When the video card arrived, I unpacked it, figured out which bay covers to remove and started to slide it in. I had a problem, though. I hadn’t carefully routed my cables and the mess of wires in the case was getting in the way of the huge video card.
I took the time to unplug everything from the motherboard to thread it outside the main housing. And then I spent another couple of hours frustrated as my problem from the night before returned. Oh, that hollow click still haunts me.
It turns out that I had two problems. The first was of my own making. When I was threading the cables neatly, a number of my fan connections became disconnected.
This shouldn’t have been a severe issue. A diagram in the manual would have set me on the right path. There wasn’t one, which left me puzzled about the correct way to get everything hooked back up.
Remember when I mentioned that there might be cables you don’t actually connect? I ended up with two wires dangling, assuming that I had misconnected something.
Thankfully, I happened upon a diagram on the manufacturer’s support page. It appears in the frequently asked questions section prompting me to wonder why something so important (and clearly confusing to many) isn’t in the manual.
I got everything connected, flipped the power switch and… click. That sound will forever symbolize defeat.
This time, I decided to troubleshoot methodically, I disconnected the two power cables from the video card and removed it. I ensured that everything else was plugged in well, including the motherboard power cables that had stymied me the night before.
Suddenly, everything sprung to life. Good. Progress.
I reinstalled the card and reconnected the power cables to the. And… click. Panic set in. Had I ended up with a bad video card? I had grounded myself with my bracelet, right?
The good news was that I could focus my efforts. I knew the problem was the video card. I could reproduce my success, too. Simply disconnecting the power from the video card brought my system back to life.
I could tell you that I was a genius and figured it out. I could tell you that the answer was obvious the whole time. I’d be lying.
On a whim, I decided to use a single, multi-connector power cable for both video card ports. I had been using two separate leads. For some reason, daisy chaining the power worked, and I have no idea why. The documentation certainly didn’t offer any explanations.
I was finally ready to close the case up and bring it upstairs. I got it all plugged in, and the system powered with no trouble. There was only one problem. My mechanical hard drive wasn’t appearing.
It wasn’t a hard fix. I just needed to open up the case again and reseat cables. This time I stayed calm.
I suspect that if I ever build another PC, that the process will go more smoothly the next time. If you are thinking about taking on this challenge, either have someone knowledgeable by your side or know who you can reach out to in a pinch.

Now What?
There are a couple of things that aren’t immediately obvious that you’ll need to do once you have Windows installed. Your motherboard likely came with a driver disc. This will handle your bluetooth, WiFi, and other items. Get this installed right away.
You’ll probably need a number of utilities you’re accustomed to using. Instead of sourcing them all from individual sites, visit Ninite.com.
There you can create a custom installer featuring productivity tools, communication apps, music streaming programs, and even Steam. Once you select your options, Ninite will install the correct version for your computer, reject any bloatware, and put off restarting until the end.
For those that use multiple game delivery services, it’s best to cue up downloads one at a time. Don’t try to grab your GoG, Steam, Battle.net, and Origin games all at the same time. That will slow you down as bandwidth is spread among them.
But the most important piece of advice I can offer at this stage is to have fun and enjoy the fruits of your labor. This isn’t an easy or inexpensive process.
And if you got help along the way, pay it forward. Somewhere down the line, you’ll run into another new builder who is in over his or her head. Take the time to try and assist and remember that person might be panicking a bit. Helping to research additional documentation or offering a word of comfort can go a long way.
If you're interested in my build list, you can check it our here.
I’d like to ask you to support Game Informer’s continued coverage of games with a subscription. For less than two dollars per issue, we mail you a full year of 10 print magazines, each with cover stories and preview features filled with exclusive details about the most exciting upcoming games. We profile and interview game creators. We look back on the rich history of gaming, and we celebrate what’s next.
Here on the website, we offer much of our content for free, including game reviews, daily news, videos, event coverage, and more – all with minimal ads.
We do so with a small editorial team, alongside contributing paid writers from around the world – over 65 individuals from 9 countries around the world, just in the last couple of years.
It’s not possible without support.
In a time when game makers and games coverage have faced hard struggles and layoffs, the future of this 30+ year magazine and community is at risk. Our new standalone magazine subscription is the number one way you can keep us alive – and we believe you’ll get a pretty fantastic gaming magazine in your mailbox every few weeks for your trouble.
Thank you.