Last chance to get your Borderlands 4 issue when ordered by July 1st. Subscribe Now!
CosBlog # 29: Twilight Princess Two-For-One

To make up for the CosBlog’s recent and mysterious absence, we've got a two-for-one cosplay serving this week featuring a pair of tributes to The Legend of Zelda: Twilight Princess. Check out the radiant Princess Zelda by Michelle Morse and the ever-altruistic Link by Mark Mathews below.
Princess Zelda by Michelle Morse

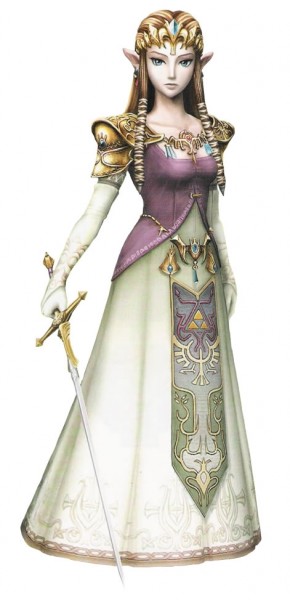 Who: The Character
Princess Zelda from The Legend of Zelda: Twilight Princess.
Why: The Decision
The Legend of Zelda has been a part of my life since I was a very small child. I've followed and played each of the games very closely throughout my lifetime. It's really hard for me to imagine life without LoZ. Princess Zelda, despite her near absence in most of the games, was never just a princess in peril to me, but the embodiment of all that is righteous, pure, beautiful, and true. She was the only thing standing between Ganon and complete absolute power (and ultimately the destruction of Hyrule, so I HAD TO rescue her. I took this all very seriously as a child, haha). She also has a very calming personality, which I'd always admired. I decided a long time ago that I wanted to cosplay every incarnation of Princess Zelda to the best of my ability. I guess you could say she's the pinnacle of my "cosplay career." I decided to start with TP Princess Zelda since her design is the most difficult (all downhill from here). It's also strangely appealing - when I first saw it, I didn't really like it. But it grew on me immensely. I also expected it to be a lot easier than it was. A deceivingly difficult costume, indeed.
What: The Process
My work time on this costume spanned an entire year and four months. I was determined to get every detail, and get them perfectly. I started out by meticulously drafting every pattern, design, accessory, gem, and piece of jewelry on the costume to scale. This helped me to understand the shape and size of everything. The pauldrons I made from a craftfoam base backed with wireform for stability, and model magic for the details. After sanding the model magic, I coated the pauldrons in fiberglass resin to create a hard surface, then I primed, painted, and weathered them. The other accessories are made from model magic coated with clear Epoxy resin. Every gem you see on the costume I created myself - model, mold and all. I casted them from clear polyester resin. The ears I bought from Aradani Costumes. The fabric I used for the gown is Silk Dupioni and Casa Satin. The Dupioni was originally a dusty pink, which I dyed to a darker dusty purple. All sewing patterns were drafted by me. The ancient Hylian glyphs at the bottom of the bodice were hand embroidered (took me about a month and a half. There are about 180 glyphs total on my bodice, each took 1 - 2 hours to stitch). The honeycomb trim at the bottom of the gown is half inch satin ribbon which I split in half to create quarter inch ribbon. I bonded that to the gown using steam-a-seam, then satin stitched it all down. For the lute designs at the bottom of the gown, I darned the design onto tear-away embroidery stabilizer, bonded that to some heat 'n' bond, then bonded them to my gown. I decided on this method because Casa Satin is a very delicate fabric, and there's no way it was going to hold up under all that darning without puckering or splitting, with or without stabilizer. The tabard is made from a wide-weave cotton woven fabric. I dyed the blue gradient myself, as well as the white-tan gradient (sadly it didn't turn out to be very visible). All designs were appliqued (with heat 'n' bond) onto the blue gradient fabric, then satin stitched down with dark brown thread. The gloves I also made myself from white matte spandex. The gray bands at the top of the gloves were the same white spandex which I gradient dyed gray. The small zigzags are painted on with fabric paint, and the large zigzags were darned with white embroidery thread the same way I darned the lute designs. The designs around the forearms of the gloves were also darned the same way.
The wig was a whole other nightmare, and definitely the most difficult, most time consuming part of this entire costume. I started out with the Enchantment wig from Amphigory in color 12, and picked up 4 packs of loose extensions in 12 and one pack of extensions in 24 (for the highlights). I mixed the two colors and sewed two and a quarter long, long wefts about 3 packs worth. It took me a total of 16 hours just to sew all the wefts in. Then I cut the last pack of wefts in half (with highlights mixed in) and sewed them in the front of the wig (for the earlocks), then wrapped them in quarter inch double fold white bias tape. The highlights at the very front of the wig were separately wefted and sewn in. I also sewed a bit of foamcore in the ponytail where the ponyholder is so it completely fills it out.
All in all, I think I spent just under $400 to make this costume. It was definitely the most work I have ever put into a costume. After months and months of working hard on this costume with the feeling of making little to no progress, I'm beyond happy that it's done, and I'm satisfied with how it turned out. =)
Where and When: The Debut
This costume was debuted at OhayoCon 2010. However the photoshoot took place about a month and a half before the convention, which was the initial test-run of the costume. We held it at the First Unitarian Church in Milwaukee, WI. When I first saw the church, driving by, I was in awe (almost rolled a stop sign!). It was just beautiful, and I was in love with the arches in the entryway. I was like "This is the place where I HAVE TO have my photoshoot!"
Links: The Cosplayer
You can find me on DeviantArt, Cosplay.com, and ACParadise
The Gallery
Photos by Ari of totallytoasty.com


Link by Mark Mathews

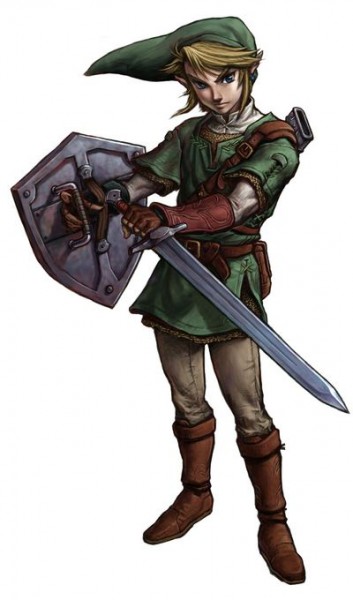 Who: The Character
Link from the Legend of Zelda Twilight Princess.
Why: The Decision
One of the first games I ever got was Legend of Zelda for my Nintendo. That’s where it really all started. I remember running around my backyard pretending I was Link, wielding my Master Sword and shield, which were made from paper, sticks and string. When I reached College, I was exposed to this strange thing called "Cosplay." From there it was all downhill. I went to my first convention and saw these fantastic Link cosplayers. It was like seeing Zelda for the first time, I immediately knew that's what I wanted to do.
What: The Process
My Link costume took almost two years of off and on work to make. I used hand dyed burlap for the tunic and hat. The master sword is all wood, with raised paper clay details. The shield is made from foam for the core, wood for the front and back, and detailed with foam and foamboard. My shirt and pants are made from muslin. The boots are made from a pair of faux suede pants that I picked up at a local thrift shop for around $2.00 and covered a old pair of Lugg boots that I had. My under bracers are also from a second hand shop, they are a jean material, that was cut from a HUGE skirt. My bags, shoulder guard and bracer were all hand cut and tooled from a single piece of leather. The belts were purchased as blanks from Tandy leather, I dyed them and added the buckles myself. My gloves were wal-mart specials; I cut and hemmed the fingers. The chainmail was made from 14 gauge galvanized steel wire, the same stuff that's used for electric fences. By far the most difficult part of the project was the chainmail. Winding the wire and cutting it into links took forever, never-mind figuring out how to weave the links into a shirt. All in all the costume cost around $600.00 to make.
Where and When: The Debut
I debuted my costume at Anime Boston 2009. The photos were taken at a park just outside the Hynes convention center and just outside the Connecticut convention center. The locations were chosen by the photographers.
Links: The Cosplayer
You can find me on Deviant art and at Blitzcosplay.com
The Gallery


Miss the past few CosBlogs? Check out the CosBlog Hub for a full archive and information on how to submit a costume of your own.
