007 First Light headlines our newest issue about the most anticipated games of 2026 and beyond. Subscribe now!

This collection of tips will help prepare for your journey into the wondrous (and dangerous) frontier featured in Red Dead Redemption II. Whether you stick to the story missions or venture off on your own to explore the wilds, you're in for a hell of an adventure. This survival guide is largely spoiler free. We don't reveal any of the discoveries you will make or give away any story details. You'll just learn about the gameplay basics, and tips that will aid you along the way.
Snap to Aim
The default targeting system turns Arthur Morgan into a sharpshooter if used correctly. Rather than moving the analog stick to highlight a target, simply point in their direction, and then pull left trigger to make the targeting reticle snap onto their body. This technique will almost always make a bullet connect with the target. This technique is invaluable when taking on foes who are on horseback. Although the snap technique just highlights the body, it’s also the quickest method for lining up headshots. Snap to their chest, then subtly move the analog stick up to target an enemy's head. Once you get comfortable with this system, you’ll be rattling off one-hit kills repeatedly. You can apply Dead Eye for the tougher shots when foes are ducking behind cover or are partially hidden behind trees.
Explore
If you see a house or something that looks interesting nearby, take the time to investigate it. Arthur may even sketch his discovery in his journal. He may also stumble upon a mission to complete. Your journal will likely look different than other players' given the freedom of exploration, and discoveries like these are some of the best entries.
Holster Your Gun and Remove Your Bandana
Most people you come across don’t like trouble. If you enter their town or homestead with a gun drawn and a bandana hiding your face, you may find yourself in a world of hurt. Holster your gun and try to greet them. Some people may not like having you on their land, at which point you can try to talk the person down, or may have to run or fight when they pull a weapon on you.
Journal
Simply hold left on the d-pad to bring up journal.
Quick Missions
Tap left on the d-pad to bring up your mission log and tasks.
Quick Map
You can skip one step of accessing the map by holding down the Options button. This brings you right into the map so you can plot your next course of action.
Upgrade the Camp
From the second Dutch and company construct a camp, you’ll be given the chance to upgrade it by spending money at the ledger. Make it an early game priority to level up every camp function to the highest tier as quickly as you can. The benefits include better supplies, fast travel, and a place to store your horses.
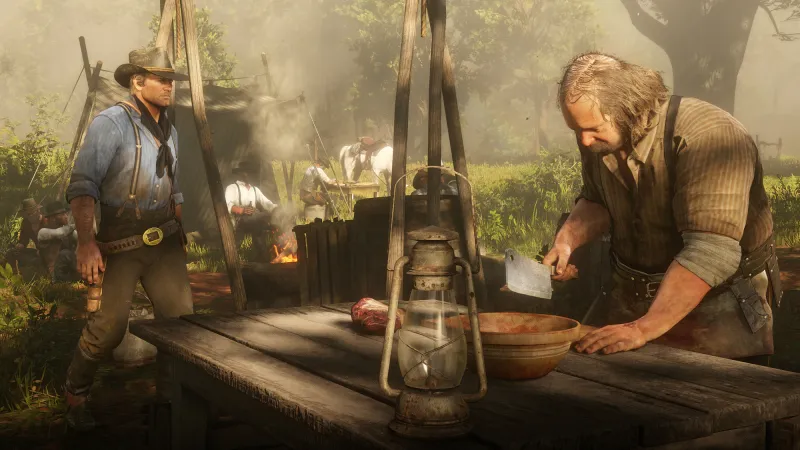
Bring Some Food On Your Way Back To Camp
Gang member Pearson is usually busy preparing the feasts, so it's on the rest of the gang to provide the cooking materials. Get into the habit of hunting some game on the way back to camp; you don't have to veer too far off the road to take down a galloping deer and throw it on the back of your horse.
How to Activate Fast Travel
You won’t be able to fast travel wherever you want whenever you want, but you can instantly move from the camp to any of the major cities. To unlock this shortcut, you need to upgrade Arthur Morgan’s tent. You’ll find a map has been added to the outside of his tent. Click on it and select the city you want to move to. Don’t worry, Arthur takes his horse with him.

Day and Night Bring Changes
You may see and experience different things if you approach certain areas of the game during day or night. We stumbled upon a small house filled with people getting day drunk. Entering that home at night showed a much different circumstance that we were glad we witnessed. Study the activities of the people of the world and think about what could come next. You may want to wait to interact with them, either at night or the next morning. You'll also find different animals only come out at night.
Set up Camp
If you’re freely exploring the world, remember that you can set up camp almost anywhere to advance the time of day. Resting puts you in a better position physically for your next adventure. The camp can also be used to create supplies that may help you in specific missions.
You’re Wanted, Now What?
Watch for bounties. Red indicators on your map indicate bounty hunters are nearby. If you’re traveling to do a quest, it’s best to avoid them so you don’t commit a crime in front of potential witnesses and lose the ability to access nearby missions for a short duration. Pull up your map to track where they are headed and lay low until they pass by.
Legendary Hunts
If you’re looking to take down the biggest game, you won’t have to aimlessly wander the wilderness until they appear. When you receive the maps for the legendary animals and fish (which are obtained through main and side quest missions), you will see a crown appear over the head of an animal or fish on your main map. These crowns show you where you will find your legendary hunt. When you enter that region, the game will also alert you that you are in the right location. You can also look at the legendary fish and animal maps individually.

Buy All The Fishing Lures
If you plan to do a fair bit of fishing, once you reach Lamoyne, head to the bait shop in Lagras. This is your one-stop shop for buying all the bait and lures you need for catching fish in swamps, lakes, and rivers. Getting them all early is nice because you don't have to worry about arriving at a prime fishing spot but not being prepared with the right gear.
Loot Everyone
A good number of enemies carry ammo, money, and personal items. If you play your cards right, the watches and rings you steal off of bodies will be the only things you need to contribute to your camp funds. You can then keep the money and use it to buy new horses, weapons, or gamble it away. Some foes will drop healing items, and perhaps even letters and documents that further flesh out the story.
Study Animals
As you’re riding to a mission start point, keep your eye out for any kind of wildlife. If you get close enough to it, click the left trigger to bring up your options, and then hit the right button to study it. Arthur will add information about the creature of note to his animal compendium. Not only is it fun to see how many animal sightings you can make, but you also learn what role the animals have in crafting and cooking. An American Bison’s meat, for example, can be used in a Thyme Prime Beef recipe, whereas a perfect pelt from a Black Bear can be crafted into a hat. Specific species also only come out at night, so you may want to take a day nap at certain points in the world to explore until the sun rises.
How to Find Plants
Specific plants can be used for crafting and healing purposes, but many of them are hard to see with the naked eye. If you’re looking for plant supplies, use your hunting instinct (by pressing R3 and L3 simultaneously) to highlight the plants you can pick. A sparkling light rises from the plants that you can interact with.
Weapon Wheel Management
Get into the habit of equipping your desired weaponry when galloping out of camp. Ambushes and random violent encounters can happen at any moment, so you want to be fully equipped instead of just wielding a couple of pistols. The game does pause the action while on the weapon wheel, but know what you have available from the outset before engaging.
Optional Missions
All necessary critical path missions are colored yellow. Optional missions are white. If you want to see everything the game has to offer, complete as many of the side missions as you can before venturing deeper on the critical path. Some of the optional missions will be harder to reach when your camp moves. When you see a white question mark in the wild, we recommend investigating it immediately. Many of these missions are tied to key gameplay features, such as collectibles and hunts. Don't worry about tackling every side mission before completing the main narrative; these will still be available to play once you are placed back in the open world after the epilogue starts.

Prepare for the Seasons
Save winter and summer outfits to your horse. You don’t want to drain health from being too cold in the mountains or too warm in the swamps. Create and save a custom outfit or use one of the sets available to you at the beginning of the game, and designate it to be placed on your horse.
Some Quests Automatically Start
If you don’t want to start a mission yet, steer clear of the mission designation area. Just stepping foot into this area could trigger a story sequence. This doesn’t always happen, and you sometimes have to physically interact with a character to get the mission rolling, but the game doesn’t indicate how each one begins, so you are better off avoiding these areas until you are ready to progress.
Eat and Drug Up
You don’t want to get into a fight when low on health and Dead Eye, or have to run from the law when you stamina is cashed out. Take care of your cores (and your horse’s as well). When you hit red it's time to head back to base, set up camp, or eat a proper meal. Same goes for your horse – watch closely and brush/feed the horse when necessary.
First-Person Helps
Use first-person while scavenging. The third person camera is a little finicky, making it hard to target specific items when several are grouped together. This type of exploration is handled much better from the first-person viewpoint, which you can switch to by hitting the touchpad on PS4 or menu on Xbox.
Clean your Guns
Your guns will perform worse over time. We recommend cleaning them after a few hours of playing. To do this, highlight the gun you want to clean in the weapon wheel, press R3 to maintain it, and then X or Square to clean it.
Take Care of Your Horse
Developing a bond with your horse will allow you to travel places faster, as your horse will gain more stamina when it bonds with you. Spending time on the horse is one way to become acquainted with your friend. You can also hop off of it to feed, pat, and groom it. Feeding it will replenish some of its stamina and health instantly.
Keep Your Horse Nearby
Few things feel worse in the game than being separated from your trusty steed. If you wander too far from your horse, it will no longer hear your whistle and won’t come when you try to retrieve it. Even if you are on a mission, you can whistle to keep your horse close. If you are riding another horse or hopping on a train, your steed will ride behind you after being summoned.
Don’t Worry About Hitching Your Horse
The game teaches you how to hitch your horse early on, but it isn’t something you need to worry about. Your horse won’t run away, and rarely veers too far from the location you left it at.

A New Hat
If you lose your hat (which sadly happens often), your head doesn’t have to stay cold for long. Any person you see wearing a hat functions as a hat store. You can knock them out and take their hat, or outright kill them. We recommend the non-lethal approach with no witnesses nearby. Enemy hats can also be scavenged after firefights. You can always re-equip your original hat when you're on your horse, as well.
Eye Your Character/Horse Profiles In The Menu
If your horse or Arthur looks worse for the wear, there may be a reason. You can get a detailed report on both of them by accessing the Player menu in the pause screen. Here you can get information on their weight, temperature, honor rating, etc. If you or your horse is underweight, it's time to feast. Don't eat too much, or you'll get pudgy.
Explore your favorite games in premium print format, delivered to your door.


