Size Matters: A Step-By-Step Guide To Replacing Your PS4 Hard Drive
Between the mandatory disc installs, increasing popularity of downloadable games and content, and title updates that can balloon into the gigabytes, you may find the stock hard drive of your PlayStation 4 filling up fast. Instead of constantly choosing which of your old games you keep installed, you may want to consider a hardware upgrade instead. Not only is swapping in a bigger hard drive a cinch, it can also provide your system with a modest speed boost.
The Right Drive For The Job
Your first task in replacing your PS4 hard drive is – surprise! – choosing a hard drive to replace it with. Sony designed the PlayStation 4 to be compatible with most internal laptop hard drives, so finding a suitable replacement shouldn't be a problem. Here are the main requirements you need to be aware of:
1. It must be a 2.5" internal hard drive, and no taller than 9.5 millimeters.
2. It must have a capacity of at least 160GB
3. It must be a Serial ATA drive
There are three basic categories of hard drives that meet the above requirements and are compatible with your PlayStation 4. Here's a breakdown of the pros and cons of each type:
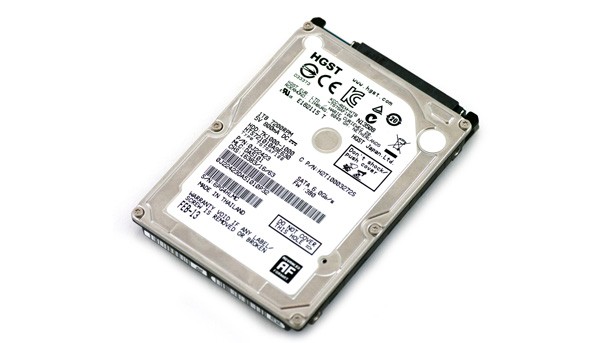
Regular Hard Drive: A run-of-the-mill internal hard drive is your cheapest option, and can provide plenty of extra space as well as a modest speed boost. Our PlayStation 4 came with a 5400RPM HGST hard drive that features a 3.0 Gb/s transfer rate and 500 gigabytes of space. We replaced it with a slightly speedier 7200RPM HGST drive that transfers data at 6.0 Gb/s and offers one terabyte (1,000 GB) of space. The new drive shaved a few seconds off of the loading times of most of the games we tested, while doubling our available hard drive space. It also only costs around $50-75, making it a great option for most gamers.

Solid State Drive: Solid-state drives are basically like massive flash drives; they don't contain a moving disk like normal drives, and are much faster because of it. We tested one of Seagate's 600 Series solid-state drives, which offered 480 gigabytes of space. It was the fastest of the drives we tested, but that speed comes at a price; the model costs anywhere between $200 and $400 depending on the retailer you buy it from – and that's for less space than the stock drive. Ultimately, you're still only saving a few extra seconds compared to other upgrade options, which makes it hard to justify the cost and space restraints of solid-state drives.

Solid State Hybrid Drive: As the name suggests, SSHDs are a mix of the two hard-drive technologies. The bulk of an SSHD's memory is stored on a traditional hard drive. However, the drive also features a small amount of flash NAND memory, which automatically stores frequently used data. We tested Seagate's one terabyte hybrid drive, which features eight gigabytes of NAND memory. The results were mixed – the initial loads for the games we tested were slower than the stock PS4 drive, but subsequent loads offered improved speeds, as did the boot sequence for the system. Hybrid drives cost only slightly more than traditional drives, so if you're the type of gamer who only plays a few titles repeatedly, you may want to consider one.
Some users have run into problems getting their PS4s to recognize hard drives that are bigger than one terabyte. Before you buy a replacement drive, search online for user reviews of the make and model you're looking at – chances are someone has already tried installing it in a PS4 and reported on its compatibility (or lack thereof).
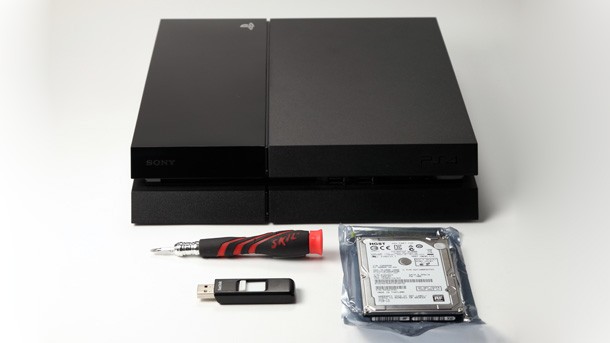
Tools Of The Trade
Once you've gotten your shiny new hard drive, you're ready to begin the upgrade process. Sony made replacing your PlayStation 4 hard drive as easy as
possible, but you'll want to make sure you've got the following items on-hand
before you start tinkering with your system:
1. A small Philips-head screwdriver
2. A USB flash drive* with at least 1GB of free space
3. Your replacement hard drive
4. A computer with Internet access
5. A micro-USB cord to re-sync your DualShock 4 controller
*The recessed USB ports on the front of the PlayStation 4 are a tight fit for most flash drives. Save yourself a headache and make sure your USB drive is skinny enough to plug in before you swap out your hard disk.
Coming Up Next: Installing your new PlayStation 4 hard drive...
Step By Step
Once you've got the above items, you're ready to replace
your hard drive. We've outlined the process in five simple steps – if your PlayStation 4 is brand new (or you don't care about your old game saves), you
can skip #2 and #5. Lucky you!
#1: Download The System Software
The first thing you'll want to do is download the system
software to your USB drive. You'll use this to initialize your new hard drive
once you install it in your PS4. Plug your USB into your computer and create a
folder called PS4 in the root drive, then create another folder inside of it
called UPDATE. Make sure both folder names are written in all uppercase
letters, or else your PS4 won't recognize them.
Next, head to Sony's website and download the system software. Clicking the link on Sony's site will download a file called PS4UPDATE.PUP – just stick that file in the UPDATE folder on your USB drive and you'll be good to go. Note: The file located at the top of Sony's page is merely an update file, and will not work for your newly replaced hard drive. Instead, you'll want to scroll down to the middle of the page and download the update located under "Perform A New Installation Of The System Software."
#2: Back Up Your Game Saves
If you plan on keeping any game saves located on your old
PS4 hard drive, you'll want to back them up before swapping the drive out. To
do so, turn on your system and head to Settings>Application Saved Data Management>Saved
Data in System Storage. Here, you have two options: You can upload your data to
the cloud (if you are a PlayStation Plus member) or upload it to a USB drive.
Feel free to use the same drive you installed the system software on – if it's
at least a 1GB drive, you should have plenty of space. Once you've chosen your
back-up method, simply click on each game file you wish to save and press Copy. Note: If you have a lot of game saves or want to back up other files such as saved screenshots and videos, you can also do a complete system back-up. While this will take up more space on your USB drive, you won't have to individually select files. To use this method, head to System>Back Up And Restore.
#3: Replace The Hard Drive
It's finally time to open your PlayStation 4. First, turn
off the system. Make sure it's actually shut down and not just in standby mode
– the light on the top of system should be completely off. Next, unplug all of
the cords from the back of the system.
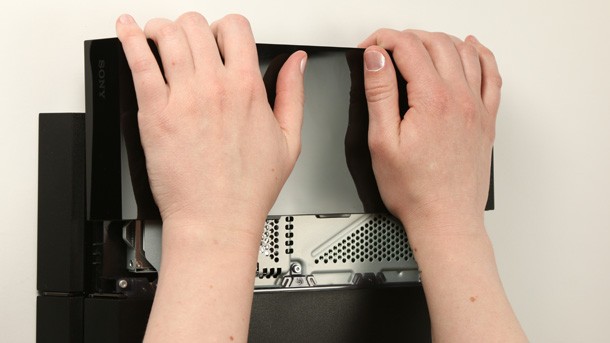
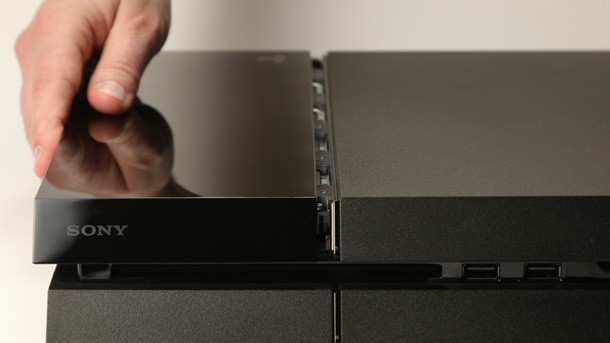
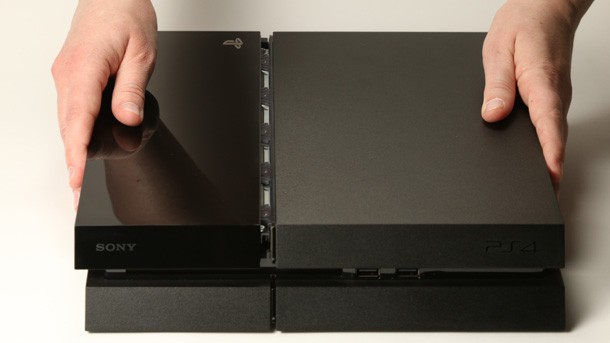
The shiny left-hand side of the PlayStation 4 provides easy access to the hard drive. Simply press down slightly with the palms of both hands and slide it to the left.
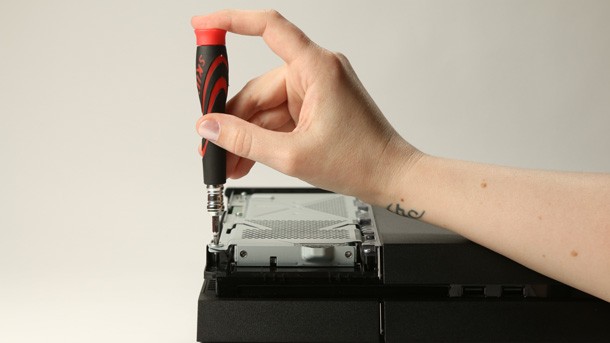
In the bottom left-hand corner, you'll see a screw with the four PlayStation button symbols. Unscrew it.

Slide out the hard drive tray using the finger hold, or just yank on it like Margaret did when she took the above picture.

On the sides of the tray are four more screws. Unscrew them and the hard drive will slide out.
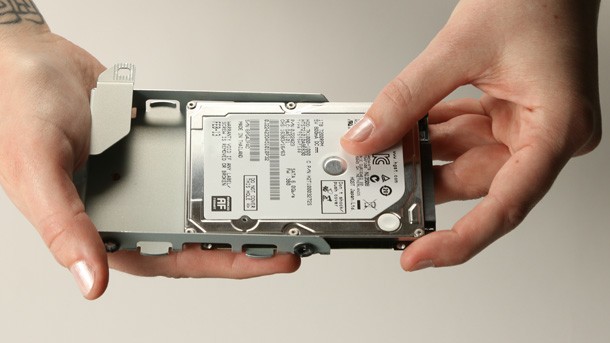
Replace it with your new drive, making sure that the connectors are facing the same way as the original drive – some drives may have to be flipped upside down. Replace the four screws to hold the drive firmly in place.
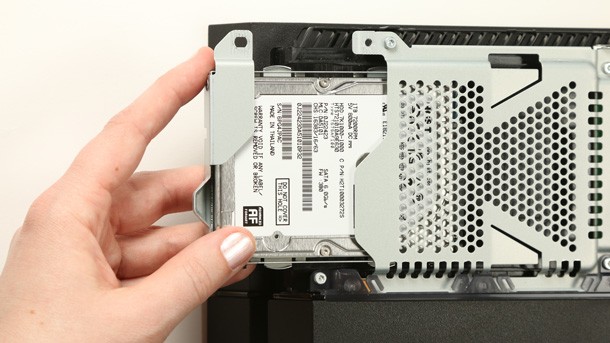
Slide the drive tray back into the PS4, then replace the screw with the PlayStation symbols.
Slide the cover back on and snap it into place – that wasn't so hard, was it?
#4: Install The PlayStation 4 Software
Plug the cords back into your system and the insert the USB
drive into one of the front USB slots. When you press the power button, the
PlayStation 4 should automatically boot into Safe Mode and start the
installation process. If it doesn't, press and hold the power button for seven
seconds when turning it on – you'll hear a second beep as the system enters
Safe Mode. Re-sync your PS4 controller with your micro USB cord, then select
"Initialize PS4 (Reinstall System Software)" from the menu.
A "Please Wait" message will appear on screen as the system prepares the installation. Don't panic – while it may seem like the system isn't responding, it will eventually prompt you with a message to confirm the initialization process. Select Yes, and you're home free!
#5: Restore Your Game Saves
If you backed up your game saves during Step 2, it's time to
copy them back over to your new hard drive. Go back to Settings>Application
Save Data Management, then select either "Saved Data in Online Storage" or "Saved
Data on USB Storage," depending on which method you used. Next, select "Copy to
System Storage," then select the data you want to retrieve. Alternatively, if you did a full system back-up, head back to System>Back Up And Restore and follow the prompts. Once completed,
head back to Settings, then choose "System Storage Management" to revel in the
size of your new drive!
This article was originally published in issue 255 of Game Informer. For more DIY improvements, check out Bertz's suggestions for perfecting your PS4 experience.
Popular Content


Get the Game Informer Print Edition!
Explore your favorite games in premium print format, delivered to your door.
- 10 issues per year
- Only $4.80 per issue
- Full digital magazine archive access
- Since 1991