Our extra-large special edition is here. Subscribe today and receive the 25% longer issue at no extra cost!
Overwhelmed By Your PC's Video Settings? We're Here To Help

The PC space has experienced a resurgence in recent years, and renewed interest means there’s a whole bunch of people getting a PC for the first time. New PC owners means new PC players, and while newcomers can spend their way around worrying about hardware configurations, every PC player needs to understand their way around an options menu. While many games will auto-detect settings, those setting aren’t always optimal. With that in mind, we’ve put together a guide to keep you on the straight and narrow when trying to get the most out of your PC.
Navigation
Resolution + Aspect Ratio | Framerate + Refresh Rate | V-sync
Window Mode | Texture Quality | Anti-Aliasing
Ambient Occlusion | Anistropic Filtering | Physics Simulations
Tessellation Quality | Effects Quality | Depth of Field
Motion Blur | Field of View | Bloom

Resolution / Aspect Ratio
What It Is:
Resolution and aspect ratio are actually fairly simple concepts and, in a world obsessed with throwing around the former around as a selling point, it’s important to know what they mean.
Resolution is the actual pixel height and width of an image. Resolutions are often referred to by their heights, so a 1080p image is 1080 pixels tall. If you’re moving to PC, it’s time to forget that little letter exists though, because you won’t find many uses for the height of your monitor on its own.
With many different monitor sizes, and display options that may all have the same height, PC players need to become familiar with using the actual image dimensions to determine the proper screen size – especially since some games still require you to set resolution manually the first time they’re launched. For example, 1080p resolution is actually 1920x1080, and 720p is actually 1280x720. It may seem annoying at first, but it’s not that hard to get used to.
Aspect Ratio, on the other hand, is the ratio of pixels in an image’s height and width. The most common format today is 16:9 (pronounced 16 by 9), which means the image is 16 pixels wide for every 9 pixels it is tall. Many PC monitors use the 16:10 format, however, so you’ll want to familiarize yourself with the accompanying resolutions if you decide on purchasing one of those. Since the aspect ratio is only a reflection of the physical dimensions of the image being displayed, there’s no inherently bad option here as it doesn’t affect the quality of the image – just how it’s displayed.
What It Does:
Resolution and aspect ratio settings determine how well a picture fits a screen, and they are rarely split from each other – an exception being games like Borderlands: The Pre Sequel. Setting the aspect ratio incorrectly can result in an image that looks stretched, squished, or has unnecessary letterboxing. However in most cases, getting the right aspect ratio and preventing image distortion will depend on picking the proper resolution.
The resolution itself can make a big difference, but the higher the resolution the smaller the change. There’s a noticeable difference between 720p and 1080p, for example, but much less of shift from 1080p to 1440p. If you want to see the effect resolution has on image quality in action, mess around with the resolution settings in a PC game.
Rendering an image for more pixels means the game is creating denser concentrations of colors, with less need to render lighter or darker shades as part of transitions, and as such is closer to what players are supposed to see. There is a caveat here though: while 720p will look terrible on a 1080p monitor, 1080p won’t look much better on a 720p monitor.
How You Should Handle It:
Despite how misunderstood they are, aspect ratio and resolution are as simple to set as matching the numbers in the game to the numbers on your monitor.
There is a reason to run a higher resolution than your monitor can handle, and we’ll get to that on the next page, but for easy handling you should look to match a game’s resolution to that of your screen. In general running a lower resolution is a big no-no, but if you splurge on a 4k monitor you’ll have a hard time getting the latest games running at that resolution.
Navigation
Resolution + Aspect Ratio | Framerate + Refresh Rate | V-sync
Window Mode | Texture Quality | Anti-Aliasing
Ambient Occlusion | Anistropic Filtering | Physics Simulations
Tessellation Quality | Effects Quality | Depth of Field
Motion Blur | Field of View | Bloom

Framerate / Refresh Rate
What It Is:
Framerate is the number of images the game being played creates every second, while Refresh Rate is the number of times a monitor updates the image it’s displaying every second. In the simplest terms, they’re both measurements of speed.
Framerate is measured in Frames Per Second (FPS) while refresh rate is measure in Cycles Per Second, more commonly denoted by the Hertz (Hz) unit of frequency. A game running at 60FPS creates 60 new images for the player to see every second, while a monitor running at 60Hz updates the image on screen 60 times every second.
What It Does:
Most games that involve refresh rates tie them to resolutions in an effort to allow players to cap the game at a framerate matching the monitor’s ability to display images. So, for example, there might be a 1920x1080 60Hz option, and a 1920x1080 120Hz option to accommodate different displays.
Sometimes games will handle that same problem by allowing players to manually set the game’s framerate in an attempt to have essentially the same effect. The goal is simple though, keep the monitor and game in sync as much as possible by capping the game’s framerate at the same speed as the monitor refreshes. Unfortunately, the option is a half measure, as it only stops games’ framerates from exceeding a certain number, but not from dropping below it.
How You Should Handle It:
If you come across a game with these options, take the same approach to setting them as you would with resolution. Whichever setting you’re given, the goal is to make the framerate and the refresh rate match.
These options will not guarantee a game’s framerate and your monitor’s refresh rate always match though. While the refresh rate of a TV or monitor is consistent at all times, games’ framerates can fluctuate wildly depending on what they are asked to render. When they don’t match up, they can cause a problem called screen tearing, which is solved by the next option.
Navigation
Resolution + Aspect Ratio | Framerate + Refresh Rate | V-sync
Window Mode | Texture Quality | Anti-Aliasing
Ambient Occlusion | Anistropic Filtering | Physics Simulations
Tessellation Quality | Effects Quality | Depth of Field
Motion Blur | Field of View | Bloom

V-sync
What It Is:
Vertical Synchronization, or V-sync, is a process which seeks to eliminate screen tearing, which are instances when the monitor displays the game as it’s in the process of updating the frame players can see. Frame tearing, shown in the image above, can happen any time the monitor and game are out of sync and occurs as the game is in the process of drawing a new image from the top down, hence the name. Since games can only cap framerates manually at one level, and screen tearing can happen when the framerate is both above and below where it should be, a more flexible solution is needed. That solution is V-sync.
What It Does:
V-sync attempts to lock the output of the game at a rate that matches the screen it’s being displayed on, or at a lower rate that avoids causing the screen tearing affect. In tech speak, the process of achieving that is complicated, but the process itself isn’t too complex.
Think of a graphics card as having two hands to hold frames in, just like you or me; one in front of itself where everyone can see, and one behind where it can manipulate things without anyone knowing. What V-sync attempts to do is draw the frame behind the GPU’s back before its needed, and then move it forward when the monitor is ready to see it. In drawing the frame ahead of time, V-sync prevents the GPU from being caught in the middle of changing things.
While this prevents screen tearing, it may also appear to impact performance as it causes some input lag and can significantly lower the framerate. Sometimes, when V-sync is on, the GPU has to hold on to the frame “behind its back” longer than it expects, and the game appears to get choppy because V-sync sends the old image again in place of the image that hasn’t been written yet.
A newer “adaptive” version, specifically for Nvidia graphics cards, is more flexible and allows for a wider range of framerates. Many newer games also have an option called Triple Buffering, which essentially creates another hand for the GPU to use behind its back. Coincidentally, players can also enable triple buffering from the control panels tied to their video cards.
Neither option is without its drawbacks, as even adaptive V-sync must drop the frame rate at some point to prevent screen tearing, and triple buffering asks more of the hardware while increasing input lag.
How You Should Handle It:
How you choose to handle V-sync comes down to personal preference. In general, turning it on will result in a higher quality image being displayed, but with some performance issues. If you’d rather have performance over everything else and don’t mind the screen tearing as much as the input lag and framerate drops, then turn it off.
I find screen tearing gives me headaches, so I tend to keep V-sync on. If you do have it on, and have a decent GPU with some power to spare, consider turning on triple buffering for a smoother experience – if you’re more familiar with console gaming, you shouldn’t notice the miniscule amount of extra lag at all.
Thanks to efforts by graphics card companies Nvidia and ATI (AMD), V-sync is dying a slow death. Both companies have released proprietary technology, G-sync and FreeSync respectively, that allows displays to communicate with GPUs and alter their refresh rates to prevent screen tearing – all without the performance detriments of standard V-sync.
Neither technology is perfect yet, but if you already have a state of the art GPU, and still have some money to burn, there’s another option for you out there if you don’t mind the prospects of being an early adopter. Both G-sync and FreeSync monitors will run you several hundred dollars more, however, so keep in mind that their added performance comes at a hefty price for now.
Navigation
Resolution + Aspect Ratio | Framerate + Refresh Rate | V-sync
Window Mode | Texture Quality | Anti-Aliasing
Ambient Occlusion | Anistropic Filtering | Physics Simulations
Tessellation Quality | Effects Quality | Depth of Field
Motion Blur | Field of View | Bloom

Window Mode
What It Is:
Window Mode is probably the simplest setting in this guide, determining whether you’re seeing the game in fullscreen, windowed, or borderless windowed mode.
What It Does:
The options are fairly self-explanatory, with the exception of borderless windowed mode. Fullscreen eliminates any borders, displaying the game on the screen as a TV would display a signal from a cable box or satellite dish. If you know what the button in the bottom right of a YouTube video does, then you’re familiar with the concept of fullscreen.
Windowed mode is exactly what it sounds like: a mode where the game displays itself within a window like any other program. The most important element is that a game in windowed mode won’t minimize to the task bar when you click on something outside of it, making it useful for benchmarking or checking guides.
Borderless windowed mode is slightly different. The game will still appear to be fullscreen, but it acts as if it’s being displayed in a window and allows the mouse to leave bounds of the game and travel to a different monitor. Like windowed mode, it allows clicking without minimizing the game, so that players can interact with other programs and jump uninterrupted back into playing.
How You Should Handle It:
The default setting will almost always be fullscreen, and for most people that’s the only option necessary. It’s also the best option for fast-paced genres like shooters and MOBAs, where the mouse leaving the confines of the screen could have dire results.
Windowed mode is useful in a handful of different scenarios. If you’re playing a slower game that doesn’t require all your attention, or need to be constantly checking an outside resource like a strategy guide, but only have one monitor to work with, windowed mode can be your best friend.
If you’re working with old hardware and want to run the game with more options on, but at a lower resolution, windowed mode can help you by eliminating the nasty looking effects of blowing the image up to a higher resolution. It can also help in a similar manner with old games that don’t support modern monitor resolutions, preventing them from looking distorted.
Borderless windowed mode isn’t quite as simple and for those who haven’t used it, the reasons for its existence require some explanation. Since it’s basically still fullscreen, it requires another monitor to use for its intended purpose. With a second monitor, it should behave like windowed mode – allowing your mouse to roam free to its heart’s content on the other display.
While borderless windowed mode is great for people with a second screen, it’s unfortunately a feature that a lot of inexperienced PC developers get wrong or just don’t include. Take 2K Sports’ NBA 2K15 for example. Despite including the feature, 2K15 experiences serious performance issues when running in borderless windowed mode, and frustratingly minimizes the game when you click outside of it.
The window mode setting can change from game to game, so take some time to experiment with different games and find out which options work best for you in each type.
Navigation
Resolution + Aspect Ratio | Framerate + Refresh Rate | V-sync
Window Mode | Texture Quality | Anti-Aliasing
Ambient Occlusion | Anistropic Filtering | Physics Simulations
Tessellation Quality | Effects Quality | Depth of Field
Motion Blur | Field of View | Bloom

Texture Quality
What It Is:
Modern games create detail on surfaces by layering 2D images over the polygonal models players interact with. Everything from the cars and buildings of Grand Theft Auto V to the tears in Bruce Wayne’s armor from the Arkham games relies on textures. The resolution of the textures or Texture Quality, which is the same basic idea as is applied to what your monitor displays, determines where they fall on the settings scale.
What It Does:
Texture quality determines the amount of detail players can see in game worlds, and in most cases all the nifty little details scattered around a game come from clever visual trickery. High or Ultra quality settings load higher resolution textures, which are less prone to looking stretched or distorted and include more detail. Low quality settings load lower resolution textures, and often result in surfaces that look smeared or text that isn’t readable, but don't require as many resources.
Due to the sheer volume and size of the textures most games load, the texture quality setting often has massive performance ramifications. For example, the difference between the Normal and High texture quality setting in GTA V on my PC back home is the difference between the game running great and being unplayable. Even with every other option set as low as possible, my PC – which uses a pair of Nvidia 660Ti cards – barely manages to handle what the game asks of it.
How You Should Handle It:
The bigger the game world, the bigger the performance impact textures are going to have. If you’re running around in a game like GTA V, which relies on a lot of textures, expect upping the texture quality to cost you. A smaller game like Call of Duty: Advanced Warfare might allow for some adjusting that lets you run at a higher setting, but that’s not a guarantee and like any PC setting some experimentation is part of the process.
In general, you want a balance between performance and visual quality. Since textures impact almost everything you see in a modern AAA game, running them as high as possible is usually not a terrible idea. However, if your only option is to turn all the little details off just to run at a higher texture quality it’s probably not worth it.
If you’re that strapped for power, you should usually just accept the lower resolution, because in a lot of cases the game will end up looking nicer when paired with the advanced options you’d be sacrificing. Keep an eye out for more detailed texture options though, like foliage or water, which might allow you to bump up in overall texture quality if you’re willing to sacrifice things you interact with less.
Navigation
Resolution + Aspect Ratio | Framerate + Refresh Rate | V-sync
Window Mode | Texture Quality | Anti-Aliasing
Ambient Occlusion | Anistropic Filtering | Physics Simulations
Tessellation Quality | Effects Quality | Depth of Field
Motion Blur | Field of View | Bloom

Anti-Aliasing
What It Is:
If you’ve ever looked at something like a telephone wire in a game and seen a jagged series of smaller lines where one clean curve should be, then you’re familiar with the concept of aliasing. Anti-Aliasing is any technology that attempts to eliminate those jagged edges, and the problems they cause.
What It Does:
In general, anti-aliasing detects areas where aliasing occurs, and attempts to eliminate them. There are a few different types, and you should know what they do.
Supersampling (SSAA) / Full Scene (FSAA) – Super Sampling anti-aliasing works by rendering the game at a much higher resolution and then shrinking it down to the desired size. This eliminates aliasing by forcing games to never render, or render less of, it in the first place.
The result is extremely smooth edges on every surface. This option has started to make a comeback lately, sneaking its way into the options menu of games as an enthusiast option simply labeled Supersampling.
Multisampling (MSAA) – Uses the same technique as SSAA, but more efficiently. Instead of rendering the entire scene at a higher resolution, it just looks at the edges of polygons and attempts to determine if anti-aliasing is needed. When it determines its services are needed, the MSAA process renders only the edge. It’s still fairly performance heavy, but a far cry from the beast that is SSAA. MSAA’s big drawback is that it can't handle aliasing in textures and other non-polygonal elements, because it just doesn’t know how to look for them.
Coverage Sampling (CSAA) / Custom-Filter (CFAA) – CSAA (Nvidia proprietary) and CFAA (AMD proprietary) are both basically the same process as MSAA, but handled more efficiently. They’re also only available on newer cards.
Fast Approximate (FXAA) / Morphological (MLAA) – These two options look at a frame after its rendered and detect areas of high contrast that are then blurred slightly to reduce the impact of the aliasing present. Because they are applied after the scene is rendered, and only have to look at a 2D image instead of every polygon, these methods are much faster than other options. Even though it was developed as an open option by Nvidia, FXAA is still far more efficient on AMD cards than the company’s own proprietary MLAA option.
Temporal (TXAA) – Nvidia specific, TXAA attempts to create a filmic look by combining elements of MSAA and FXAA. The result is a softer image that resembles what you might see on screen at a movie theater, but at a considerable performance cost.
Multi-Frame (MFAA) – MFAA is the latest greatest anti-aliasing technique from Nvidia, present only on their newest 900 series cards. Multi-frame anti-aliasing affects how a game decides what to render where. Normally, when a game decides what color a pixel needs to be it looks at a point in the very center, compares it to what’s going on, and then sets its color based on that. What MFAA asks it to do is use two alternating points in the pixel as a reference. With each frame the point of reference for every pixel shifts from one side to the other.
The MFAA process then looks at the relationship between the two rendered frames and decides what color the pixel should be when rendered properly. The result is low performance cost anti-aliasing, since it doesn’t have to do as much intensive searching to find the aliasing it’s attempting to eliminate.
How You Should Handle It:
This is entirely dependent on your hardware and your personal preference. In most cases you’ll be given a choice between different types at different levels; which are denoted by x2, x4, x8, or x16. Your goal should be to run the highest number in your preferred style.
A lot of people choose to play without anti-aliasing instead of dealing with the blurring effect of FXAA and MLAA, letting their horsepower do heavy lifting elsewhere. If you’re dead set on having the feature turned on, but don’t have a lot of power to work with, there’s no reason to use MLAA over FXAA. FXAA is the most efficient anti-aliasing method around, and the go to for low power applications.
If you have a little more room to work with, MSAA is generally considered a nice middle-ground. While it’s more taxing, and can miss some things, it also avoids blurring anything. The resulting image is crisper, and the effect is more consistently applied to the areas it can detect because it’s looking at physical things and not for contrast that might actually be something that’s supposed to exist. Given the option, CSAA and CFAA are better choices than MSAA – since they both do the same thing with less of a performance cost.
Some people hate TXAA with a passion, because it takes away the sharp definition games normally have, but it also has plenty of fans. If you don’t mind your games looking less crisp overall, then this is a solid choice. You will need some extra power though, as this technique combines bits and pieces of others.
Finally, if you have a top-of-the-line Nvidia GPU and the option to use it, there’s no real reason to avoid running MFAA. You might get similar performance from CSAA if given the option, but MFAA performs more consistently across a whole scene than MSAA with roughly half the cost.
Unless you’re packing two or more of Nvidia’s monstrous GTX Titan or Titan X cards into your machine, there’s almost no reason to run SSAA. Your PC won’t be able to run well with the option on, and you can achieve a similar, but less prominent, effect at a lower cost by setting a custom resolution on your PC and running the game at a slightly higher resolution.
Navigation
Resolution + Aspect Ratio | Framerate + Refresh Rate | V-sync
Window Mode | Texture Quality | Anti-Aliasing
Ambient Occlusion | Anistropic Filtering | Physics Simulations
Tessellation Quality | Effects Quality | Depth of Field
Motion Blur | Field of View | Bloom

Ambient Occlusion
What It Is:
Ambient Occlusion is the video game world's answer to the extremely intense process of generating global lighting. With global lighting taking hours to render in some cases, ambient occlusion's approximation has been the only way to generate realistic lighting.
What It Does:
Ambient occlusion looks at the world in relation to its light sources and then generates shadows for things that wouldn't normally have them – or creates better looking shadows for things that do. There are three main types you need to know about.
Screen Space (SSAO) – SSAO is what came around when ambient occlusion first began popping up in games. It's resource cheap, but it doesn't factor in objects that aren't on-screen and doesn't enhance shadows as well.
Horizon Based + (HBAO+) – This form of ambient occlusion is the most advanced to regularly appear in games, and an Nvidia-optimized option. An update to HBAO, which better accounts for the wide range of shadowed objects in a scene, HBAO+ is a more optimized technique that also produces better quality shadows.
High Definition (HDAO) – AMD's answer to the original HBAO, it operates on the same basic premise but is optimized for AMD's video cards and requires a little more power.
How You Should Handle It:
Like FXAA, SSAO is the go-to option if you have an older PC or are looking for a little extra performance. It does a decent job, but compared to the nicer techniques it leaves a bit to be desired. If you're using an Nvidia GPU, then HBAO+ should be your target quality setting every time. If you're using an AMD GPU, then do a little experimenting with HDAO and HBAO+ if they're both supported.
Ambient occlusion is also a relatively new technology, so keep an eye out for new developments as developers search for better approximations of global lighting.
Navigation
Resolution + Aspect Ratio | Framerate + Refresh Rate | V-sync
Window Mode | Texture Quality | Anti-Aliasing
Ambient Occlusion | Anistropic Filtering | Physics Simulations
Tessellation Quality | Effects Quality | Depth of Field
Motion Blur | Field of View | Bloom
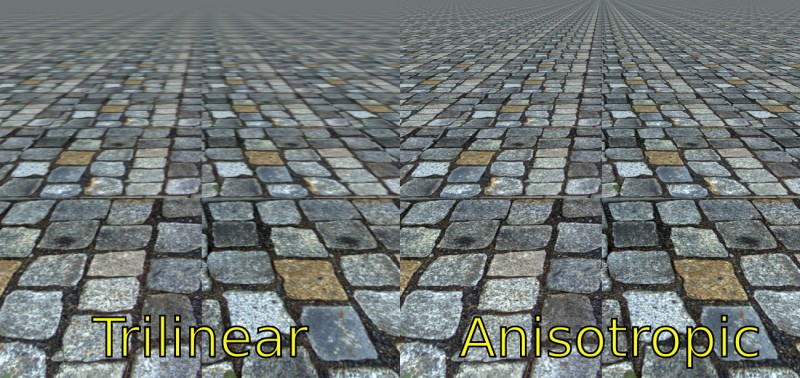
Anisotropic Filtering
What It Is:
Anisotropic Filtering is the replacement for bilinear and trilinear filtering, techniques which previously sought to improve visuals and performance by transitioning between different levels of quality for distant objects. Anisotropic filtering is more efficient and better looking, making it the default filtering option for most modern games.
What It Does:
Anisotropic filtering blends high-quality textures close to players, with lower quality textures in the distance. The result is a more natural looking, less blurry world with less texture pop-in, that also doesn't have to load extremely detailed textures where players can’t perceive that detail. Ideally the player never sees one of the high-quality textures load in or one of the low-quality textures up close.
How You Should Handle It:
Unless you have a significantly underpowered PC, anisotropic filtering should have little performance impact on your game – so go ahead and crank it up as high as possible.
Navigation
Resolution + Aspect Ratio | Framerate + Refresh Rate | V-sync
Window Mode | Texture Quality | Anti-Aliasing
Ambient Occlusion | Anistropic Filtering | Physics Simulations
Tessellation Quality | Effects Quality | Depth of Field
Motion Blur | Field of View | Bloom
High Detail Physics Simulations
What They Are:
High detail physics simulations attempt to simulate complex physics that are unreasonable to include in a game's normal physics engine. Things like Nvidia's PhysX or AMD's TressFX fall into this category. These simulations are the bleeding edge of physics technology.
What They Do:
Nvidia's PhysX has a wide range of applications, from advanced cloth physics to rendering shards of broken glass. AMD's TressFX has a very specific application, rendering realistic hair. In most cases, these options either turn everything they simulate on or off. Don’t expect to see Batman’s cape wave in the breeze, but you’ll save some performance on breaking glass.
How You Should Handle It:
If a game even supports them at all, turn them on and marvel at technology that is years away from being implemented normally. After you're done gawking at them, in most cases the best option is to turn them off and never touch the setting again. There are a few games, like the Arkham series, that handle PhysX decently, but in many cases the technology PhysX supports is just as distracting as it is impressive – and the feature itself is rarely supported anyways.
If you have a high-end PC and a bit of power to spare, it’s okay to turn it on – though you may see performance dip as a result. You may be better off saving your PC from some unnecessary wear and tear. If you don't have a top-of-the-line PC, or are experiencing performance issues, heavy-weight aesthetic options like these should be the first things that you turn off.
Navigation
Resolution + Aspect Ratio | Framerate + Refresh Rate | V-sync
Window Mode | Texture Quality | Anti-Aliasing
Ambient Occlusion | Anistropic Filtering | Physics Simulations
Tessellation Quality | Effects Quality | Depth of Field
Motion Blur | Field of View | Bloom

Tessellation Quality
What It Is:
Tessellation is a process that manipulates existing geometry to add more depth to things like walls and ground. It’s something that’s already part of many games, and it’s an integral part of making character models look nice and smooth. However, newer games like Dragon Age: Inquisition allow players to dynamically adjust tessellation that’s being used to provide environmental detail.
What It Does:
Tessellation makes the geometry of in game polygons more detailed in order to help add depth to environmental details that might normally look too flat. A low quality level means everything looks like it normally would, while a high quality level means things like divots and pebbles in a dirt road look more pronounced.
How You Should Handle It:
Tessellation requires a lot of processing power, as it increases the different number of little pieces your PC has to account for. The added detail is also only noticeable if you stand around staring at things. It’s going to be hard to notice the little bit of extra detail as you chase a dragon across The Hinterlands, for example. If you’ve got top-notch hardware, crank it up, but as with the physics simulations your resources are probably spent better somewhere else like better shadows or a higher level of anti-aliasing.
Navigation
Resolution + Aspect Ratio | Framerate + Refresh Rate | V-sync
Window Mode | Texture Quality | Anti-Aliasing
Ambient Occlusion | Anistropic Filtering | Physics Simulations
Tessellation Quality | Effects Quality | Depth of Field
Motion Blur | Field of View | Bloom

Effects Quality
What It Is:
Sometimes games with a lot of different effects like spells or fog break out settings for those elements into their own category or categories. The Effects Quality setting, or settings, is tied to different in-game effects, like the ice from a mage’s spell or an explosion from a grenade.
What It Does:
Effects quality settings determine things like the density of an explosion, the complexity of a lightning spell, or how fog in a game is rendered. In these cases, lower settings will result in either less volume or lower detail, like fog appearing more 2D than 3D; meanwhile, high settings will produce bigger, more detailed effects.
How You Should Handle It:
This is one of the most experimental settings you can find. Play around with it and find something that looks good to you while also preserving the game’s performance. If your game starts chugging every time you cast a spell or blow something up, effects quality is probably where you need to start looking in order to fix the problem. These settings might not all be under the same name, so pay attention to individual options in your favorite games.
Navigation
Resolution + Aspect Ratio | Framerate + Refresh Rate | V-sync
Window Mode | Texture Quality | Anti-Aliasing
Ambient Occlusion | Anistropic Filtering | Physics Simulations
Tessellation Quality | Effects Quality | Depth of Field
Motion Blur | Field of View | Bloom

Field of View / Motion Blur / Depth of Field / Bloom
What They Are:
These are some of the most common stylistic settings. They may not have a drastic impact on performance, but they do affect subtle elements of how your game looks. They’re also paired together here because they’re good targets for when your game is making you feel a little sick.
What They Do:
Field of View (FoV) – Commonly referred to as FoV in game settings, this setting changes the viewing angle of the in-game camera. A wider angle means you can see more of the game, a narrower angle less. This setting can have a slight impact on performance, as it changes what the game needs to render.
Motion Blur – This setting adds motion blur that would be similar to what you see in a still frame from a camera, and usually doesn’t have a significant performance impact.
Depth of Field – This setting creates a depth of field affect, or in other words it makes things in the distance look blurrier as they would in a movie. This setting is sometimes referred to as DoF.
Bloom – Bloom is the practice of making light in a game mimic how people's eyes react to bright light in real life. Since your monitor can only get so bright, this effect is used to make lights look brighter than they actually are.
How You Should Handle Them:
All of these setting are purely preferential, but they are a good place to start poking around if you’re feeling sick while playing your games.
Field of View – FoV needs to be set based on how close you are to your screen. If you’re right in front of a big PC monitor at a desk, then a higher FoV is often preferable. If you’re sitting on a couch and playing on a TV, a lower FoV is recommended. If you ever feel like you have tunnel vision or the game looks like it’s using a “fish eye” lens, then adjust this setting.
Motion Blur – Motion blur mimics something from the movies, and isn’t necessary or often even noticeable. I find even subtle motion blur makes me feel nauseous, so I turn it off whenever possible.
Depth of Field – While it might create an interesting affect for cutscenes, your eye already creates its own DoF effect naturally as you focus on something on the screen. Newer DoF techniques can also be very taxing on hardware, so it’s probably in your best interest to turn them off or at least down.
Bloom – Bloom is almost always overused in games (see the image of BioShock Infinite at the top of this section or look up some screenshots of EA’s Syndicate reboot). The effect also gives a lot of people headaches, as it can cause eye strain. I turn it off every chance I get, though some games are not so gracious as to allow that.
Navigation
Resolution + Aspect Ratio | Framerate + Refresh Rate | V-sync
Window Mode | Texture Quality | Anti-Aliasing
Ambient Occlusion | Anistropic Filtering | Physics Simulations
Tessellation Quality | Effects Quality | Depth of Field
Motion Blur | Field of View | Bloom
Popular Content


Get the Game Informer Print Edition!
Explore your favorite games in premium print format, delivered to your door.
- 10 issues per year
- Only $4.80 per issue
- Full digital magazine archive access
- Since 1991