Please support Game Informer. Print magazine subscriptions are less than $2 per issue
Custom Vinyl: Silent Hill Staples

I’ve been on a bit of a Silent Hill kick the past few weeks and these little guys are the reason why. After creating my first custom Munny figures a few weeks back, I began feverishly debating what I should take on next. I almost instantly had my mind made up to pay tribute to BioShock with a Big Daddy and Big Sister duo, but got sidetracked by the thought of bringing to life two of Silent Hill’s most iconic monstrosities – Pyramid Head and a Nurse. Trapping myself into finishing these guys this week, I preemptively tied my CosBlog entry on Wednesday to Silent Hill. If you haven’t checked it out yet, do so here!
On to the specifics! I spent quite a bit of time researching the various iterations of each character that I could draw from, and ultimately decided to reference the Silent Hill movie for several reasons. Not only do I find them the most interesting, but the source material coming from a movie allowed me to watch and rewatch clips in order to get a good grasp on the costumes. You can read my breakdown of creating these critters below. Or you can skip to the photos. Your choice!
Creating the nurse gave me an opportunity to bond clay to a Munny for the first time. After washing, sanding and priming, I covered her head with Super Sculpy and began working it into the final form with a dull butter knife. I decided to augment the Munny’s chest with clay as well. Let’s face it; the odd fascination most have with Silent Hill’s nurse population stems from the juxtaposition of sex and gore. So really, I couldn’t leave her cleavage out.
Working the clay took a few hours to finish, and when done I began the drying process. After reading the instructions online several times over, I baked the Munny head and body in the oven for fifteen minutes. The vinyl figure came out of the oven a bit soft, but didn’t lose any of its shape in the process. After a half hour everything cooled down and hardened as expected.
From there I primed the Munny again with a base coat of flesh-colored paint and began mixing various skin shades and yellow hues which I stippled all over her body. I intentionally layered colors to give her skin a mottled look, using toilet paper instead of a brush so that fibers would stick to the figure and make her skin look like it was peeling. The result is pretty cool. I used more yellow and green tones in the mask, with darker browns in the crevasses to play up the change in depth. To make her veins pop, I painted stark lines of purple and red on her chest, arms, and legs, then went over it again with the yellow color to slightly subdue the look.
Moving onto clothing, I stained a white nylon sock with coffee grounds in order to make it look grimy. Then I glued it to her body using liquid latex, making sure to accentuate her chest and legs. I added little pockets on the front of the dress for more detail, and continued to stain the outfit with, of all things, chicken and beef bouillon cubes. I was having trouble finding small enough circular objects to use for buttons, so I decided to kill two birds with one stone and use nails. The nails secured the dress in place and once painted, the heads worked perfectly.
Almost finished at that point, I made the nurse hat out of Wonderflex, and then used some extra stained fabric to line it. Her switchblade razor is made from the same material. For the last step I added spots of blood to introduce a bit more color, coating her dress, hat and razor with various diluted and non-diluted mixtures of special FX blood. With that, she was done!
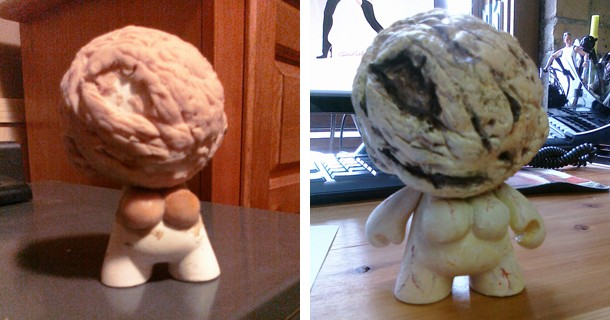
Obviously, Pyramid Head’s helmet was the biggest time vampire of the whole project. So let’s start with the easy stuff. I scavenged through the craft store to find fabric that could pass for human skin, sewing it together with leather cording for extra detail. Once finished, I rubbed leather stain and oil in a few places to make it more interesting. Easy enough. I painted the body with the same technique as the Nurse – layering shades of color dobbed on with toilet paper for extra texture.
On to the helmet. I drew heavily from the design in the movie, except for a few slight modifications so not to obscure the endearing Munny elements – namely the iconic ears. I didn’t want to cover the entire head with the helmet, so I lobbed off the top half, leaving just a bit of the lower half showing. I started creating the helmet with Wonderflex after working out a template in paper. From there I glued layers of thin foam to the base of the helmet, securing the seams with black electrical tape. Drywall tape was used to get the grid-like pattern, and a second layer of foam was added on top. The hardware came last. When finally finished layering things on, I coated the entire thing with several layers of plastic primer, allowing nearly a week to pass and insure it was fully dry before I started the detail work.

The painting process started with a coat of black paint, and then I stippled grey over the top to provide texture – again with toilet paper. From there I added various shades of burnt orange and red for rust around the hardware, and took a knife to the foam to scratch in silver in various locations. Last, I flicked the entire thing with some fake blood dobbed on a toothbrush, which has since been decommissioned from active duty.
I left a small vertical band of the Munny’s head attached, which I stuck inside the bottom of the helmet for support. From there I glued the piece on with hot glue, coated it with liquid latex, and layered purple and reds along the joint to make it look like his skull had fused with the metal. All done!
Last came the Great Knife. I used an actual steak knife for this thing, filing down the serrated edges by hand before wising up and using a massive grinder to do the rest of the work, including shaving down the handle to be a bit more proportional. I used the same painting technique for the knife as the helmet, and used silver to highlight the sharpened edge. For the final touch I added some brown leather cording to the hilt. Then came the blood. Blood on the fused section of the helmet, on his skirt, and his sword. I let it dry in coats to make it look crusty. You can check out the final product in the gallery below! Thanks to Nick for the photos!


Overall, I am really happy with how these guys turned out. They were a ton of fun to make and gave me a chance to test my skill in a few new mediums. I plan on entering them in a custom contest at a local collector’s shop that runs until the end of the month, but will sell them through Etsy or eBay afterwards. If anyone is interested in picking them up before I list them, let me know.
So what’s next? I don’t want to spoil it, but my next custom Munny will involve clay and carving vinyl once again. I’ll be sure to blog about it when it’s finished! Thanks for reading!
[Interested in making your own custom creations? Kidrobot.com has all the information you’ll need to get started.]
I’d like to ask you to support Game Informer’s continued coverage of games with a subscription. For less than two dollars per issue, we mail you a full year of 10 print magazines, each with cover stories and preview features filled with exclusive details about the most exciting upcoming games. We profile and interview game creators. We look back on the rich history of gaming, and we celebrate what’s next.
Here on the website, we offer much of our content for free, including game reviews, daily news, videos, event coverage, and more – all with minimal ads.
We do so with a small editorial team, alongside contributing paid writers from around the world – over 65 individuals from 9 countries around the world, just in the last couple of years.
It’s not possible without support.
In a time when game makers and games coverage have faced hard struggles and layoffs, the future of this 30+ year magazine and community is at risk. Our new standalone magazine subscription is the number one way you can keep us alive – and we believe you’ll get a pretty fantastic gaming magazine in your mailbox every few weeks for your trouble.
Thank you.