Subscribe today to receive the next issue of Game Informer, featuring the Most Anticipated Games of 2026!
The Beginner's Guide To Xenoblade Chronicles X
After a long wait, Xenoblade Chronicles X is finally out in North America. After around a hundred hours wandering the alien planet of Mira, I shared my thoughts in our recent review. While I had mixed feelings about the grind-heavy experience, there is without a doubt a lot to explore and discover in Monolith Soft’s new game, if you’re up for the time investment. To help you get started, I’ve gathered some of my best tips for success as you learn the ropes.
Change Camera Settings
Upon starting up Xenoblade Chronicles X for the first time, you may be discombobulated by the various aspects of camera view and control. For most users, leaving camera settings at their default settings is not recommended. Thankfully, Monolith Soft and Nintendo have included helpful camera control customization options, if you’re willing to take the time to do some tweaks.
In my opinion, the default vertical camera rotation speed setting was too fast, and the horizontal too slow for my taste, so I made them both more uniform to one another, which should feel more familiar to many North American players, especially if you play a lot of FPS or action games. You may also want to tweak the height of the camera as well as the potential zoom capabilities of that camera as you move around.
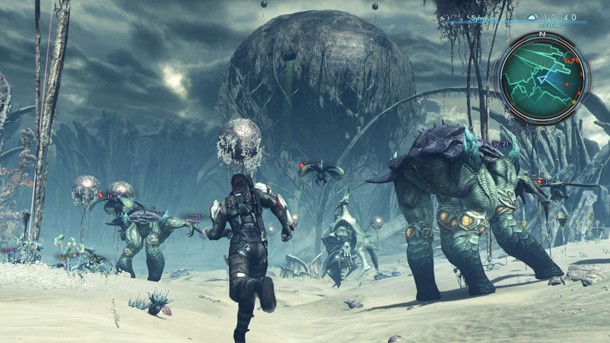
In many cases, the monsters you fight in Xenoblade Chronicles X are extremely large, and you’ll want to zoom way out to get a good view of the action. But it’s easy to miss (or forget) the instruction on how to do so in game, even once you have your zoom settings how you like. Hold down the left shoulder button on your Wii U controller, and you’ll see an option pop up to change the camera zoom. Don’t be afraid to use this, even in the midst of battle, to get a better view.
Remember Manuals?
These days, most games don’t even include an instruction manual, and instead rely on in-game tutorials to familiarize you with its systems. While Xenoblade Chronicles X does a little of that, many of the game’s systems remain unexplained without some investigation and experimentation.
Thankfully, there is a well-indexed manual built into the game, which can be reached from the main menu. If you’re confused, there’s a decent chance that the in-game manual will have an answer. Do I think this is a great way to introduce players to new concepts? Absolutely not. But, that doesn’t mean I didn’t use it when I got lost in one system or another.
Be Artistic
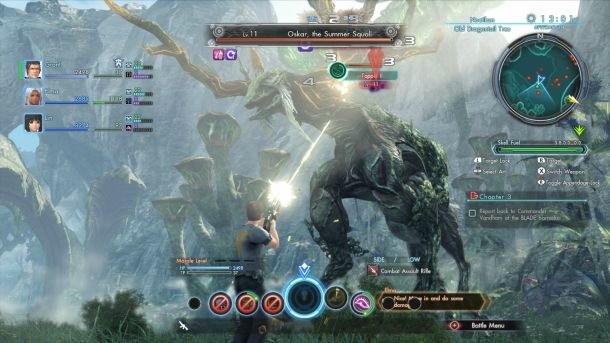
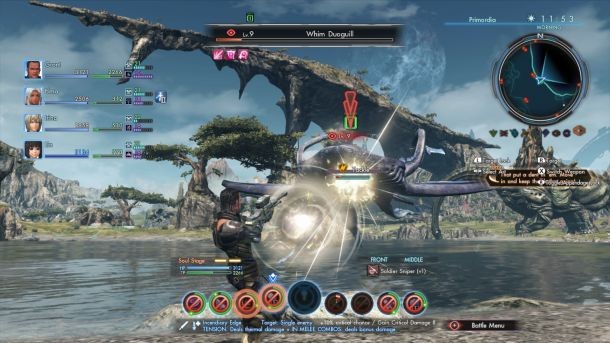
One of the first things you should pay attention to in Xenoblade Chronicles X is the Arts system. These abilities map to a hotbar at the bottom of the screen, and are the main way you’ll bring down your enemies.
In the beginning, you’ll only have a few arts to manage in combat, but it won’t be too many hours before you have more arts than you have space for in the hotbar. As such, you should think about which arts combo well together, and take the time in your menu (between battles) to set an optimum loadout. Examine each art, and look for other arts that work well together. For instance, one art might cause the topple condition, while another does bonus damage to toppled enemies. On a side note, topple is one of the most useful effects in the game, as it immobilizes the enemy for a few seconds. Trigger it whenever you can.
Consider placing arts that combo well with one another side-by-side in your hotbar, so it’s easy to remember their pairing.
Your battle capabilities are enhanced by a system called Soul Voices, which can also be customized from the party menu, but they can be a little confusing upon first glance. The basic idea is that when certain conditions are met in battle, then your chosen effect occurs. Take a look at the various effects you can trigger, and select options that work well with your chosen arts and party of characters.
One other thing to pay attention to is your tension, or TP. Some arts (as well as your basic melee and ranged attacks) build TP. Other arts consume TP, and if you get to 3000, you can trigger a helpful overdrive to do a lot of damage to your foes. If you’re really struggling with a hard bounty hunt or boss, consider building up your TP in other battles first, and then going in all guns blazing.
Next Page: Learn about creating your ideal character build, and the importance of taking lots of missions at once
Build Smart For A Smart Build
Xenoblade Chronicles X features a freeform class system that can fool you into believing you should endlessly experiment, and never commit to a single path. While that may be partially true in the long term, your early priority should be on selecting a class path, and sticking with it.
The game starts you out as a generalist class, but you’ll max that out quickly, at which point it’s time to select one of three options. For an all-purpose, beginner-friendly class, you can’t go wrong with the striker, which uses a combination of long sword and assault rifle, and features a balanced set of defensive and offensive abilities. But if something else strongly appeals, go for it.
One easy misstep is to select a class, and then neglect it once it’s maxed out. The game does a poor job of communicating that you’ve maxed out your current class, so check your class menu on a regular bases. Once you do max out a class, you’re able to take the next most advanced class in the chain. Unlike completely changing classes by heading to a different branch of the class tree, these more advanced classes often use the same weapons and style of combat, and they’re worth investing in.
The game also doesn’t communicate very clearly about other ways to improve existing arts and skills. Arts are active combat abilities, while skills are more passive effects that can improve your combat efficiency. Both are upgraded in your party menu from separate selections, but they both use battle points to rank up. Take some time to get familiar with the arts and skills you like, and then invest battle points to improve their effectiveness.
All the leveling in the world is for naught if you don’t have decent gear. We’ll talk in a bit about the best way to open up better purchaseable gear through arms manufacturers, but even once unlocked, you’ll need to go spend some money and pick it up. Many gear pieces also have slots for augments, which can lead to some significant bonuses if you invest in them.
Finally, if you’re confused about which gear to equip, use your character’s submenu and “Equip Strongest Gear” for a quick and dirty optimization. But be careful! This process might unequip the correct weapon for your current class, or remove an otherwise rare and valuable item because the system overvalues a particular stat.
As an aside, the character submenu also allows you to select fashion gear – so no matter what armor you’re wearing for stats, you can still look the way you want.
Grab Those Missions
Across from the main HQ barracks in NLA, you’ll find a mission board. It can be hard to tell which missions you’re ready to tackle or not, but that shouldn’t stop you from grabbing a bunch and keeping them active. You can carry up to 20 of these basic missions at once, and you should make a point to always have that many going at all times. That’s because you’ll often complete them inadvertently for a nice little boost of rewards. For instance, many gathering missions will be completed by simply picking things up as you’re exploring the world, while enemy hunts might happen accidentally when you pass by a particular enemy.
Affinity missions are scattered around the city. It’s up to you to pursue activities you enjoy in the game, but I recommend playing some of these to flesh out the broader party of characters. In addition, several of these affinity missions are required in order to progress through the story.
Next Page: Tips on world exploration
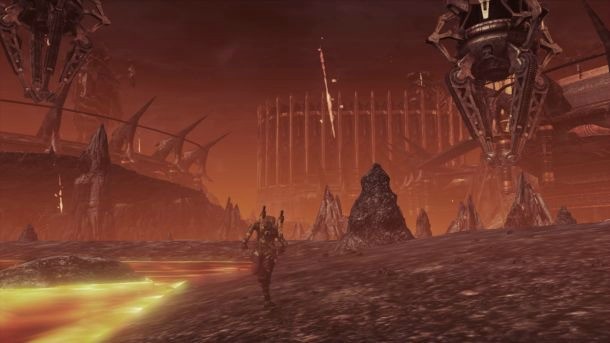
Explore, Explore, Explore
A lot of Xenoblade Chronicles X is built around exploring the game world and uncovering its secrets. Here are some things to keep in mind as you do so.
Use fast travel. The game includes a large network of fast travel locations, and it’s really a waste of time to not use them. The game already has plenty of grinding without the need to run back and forth between distant locations all the time. In fact, you should try to unlock as many fast travel nodes as you can early on, primarily through finding data points (they’re highlighted when you get close by a laser shooting into the sky). Many of the story missions require that you survey a certain percentage of the planet, so you may as well do this early.
In addition to data points, you should also stop and do field actions (highlighted in yellow on the screen). These field actions require you to have a certain skill level in mechanical, archaeological, or biological skill. I strongly recommend prioritizing mechanical first, as many data points require a higher mechanical skill.
In order to increase your field skill, you need to increase your Blade level by completing tasks in the world, and then return to Eleanora, a character located right next to the basic mission board in NLA. Each time you level, you’ll get one more field skill level.
As you explore, make a point to steer off the crow’s path to a destination to pick up blue gems in the field. These items are often the target of later gathering missions, or used in upgrade options.
If you’re having a hard time navigating a particular area, be aware that many monsters show up exclusively at night. Try finding a rest area, either at the various waystations out in the world, or back at your barracks, and then return during the day time, and things may be easier.
The same holds true for weather conditions, which can cause some significant headaches. Weather in Oblivia can sometimes cause continuous damage to your character. And in Sylvalum, I encountered thick fogs that completely obscured vision. Return later and these weather effects often clear up.
Last but not least, take advantage of the follow ball, which is attained a few chapters into the main story. This lets you track your currently selected mission, if it has a definitive place you need to visit. It won’t help on those frustrating gathering missions, but otherwise it’s very helpful. In addition, your target location is also marked on your Wii U gamepad map, so you can and should fast travel to the nearest node and hoof it from there.
Next Page: Everything you need to know about those mechanized skells
The Long-Awaited Driver’s License
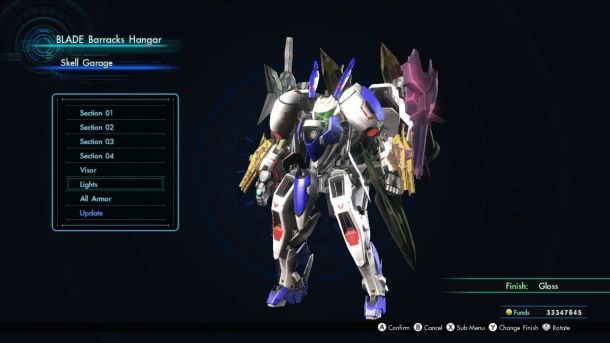
This probably goes without saying, but you want to get your skell as soon as possible. These mechanized units make both combat and exploration way easier, so it should be a top priority to unlock skell usage and then use them virtually all the time.
Finish story chapter 6 to get your first skell, then head to the barracks to connect it up to your main character from the same terminal that you use to customize your barracks (just below the ramp that leads up to the story chapter acceptance area). While that first skell is handy, it’s now time to prioritize purchasing three additional skells, so that at any time, all of your party members can be at their full combat potential. You should also consider buying those new skells weapons and shields to put them at their full potential. In total, this is an absolutely huge money investment, so here’s hoping you’ve been saving up. Don’t worry if you can’t get all your skells purchased and suitably equipped right away, but once you have your license, make it a priority.
As for getting your license, there’s a lengthy, multi-part quest to do so. Most of those steps are pretty self-explanatory, but one step in particular is a real time waster if you don’t know where to go. You’re told to gather “beagflea squashes.” You cannot obtain your skell until this step is complete, but the game offers no guidance about where to find this item. Head to the northeastern section of the Oblivia continent, and find a place called Lake Basel. I found all of my beagflea squashes in the water of that lake.
Later, after chapter 9, you can get your flight license. Like before, you should prioritize this right away. Flight once again dramatically expands your exploration options, and having a flight license is required to complete the final story mission, anyway, so it’s best to just get that done. Flying your skell is also one of the coolest parts of the game, so it’s silly to force yourself to wait.
When driving your skell, keep two things in mind. First, you’re constantly using fuel, and you’ll need to return to your barracks to refuel by using miranium. Do so regularly, even if it means slowing down on the process of improving the various arms manufacturers. Second, keep an eye on your skell’s health during hard fights. If your skell is destroyed, make sure, you’ll get a timed button press of B to complete. If you don’t successfully hit the button, you’ll use up one of three stacks of insurance on your skell. Use them all and you’ll need to pay a hefty replacement fee. Regardless, even if you do nail the button press, you’ll still need to return to the barracks to get a new skell.
When you’re out exploring on your skell, it’s a great time to level your chosen class. Skell power is based on overall character level, not class level, but you still gain XP for your class while in your skell. So, if you’ve been hungry to switch classes and try something different after maxing out your initial class, doing so while piloting your skell is a good idea.
On a related note, don’t completely neglect upgrades to your ground gear after you acquire your skell. A select number of missions (and a couple of bosses) must be defeated without your skells late in the game, so it’s important to stay up to date.
Next Page: The big secret to big money, and why you shouldn't do inventory management.
Cheat The System
Xenoblade Chronicles X features a system whereby you lay down probes at data points, which in turn provide money and mining resources on a regular basis, based on a timed tick. You should definitely take the time to lay down your mining and other probes, and take advantage of the opportunity to link identical probes in close proximity. When placing probes, also note the grade potential for that data point. If it’s an “A” rating for mining production, take advantage of that.
It may not be good for your Wii U or your energy bill, but once you get a good-sized network going, that constant time tick will earn money for you even if you’re not actively playing. Consider returning to a safe place (like NLA), plug in your Wii U controller to charge, and leave the game for a little while. You’ll accrue money and miranium (the main mining resource), and have a nice supply waiting for you when you return. Just be careful; some menu and pause screens halt the timer, so I recommend leaving your character standing without any menus onscreen.
The fault in this plan is that you’ll hit a miranium storage max. To counter this, you can come back every 20 minutes or so and invest your acquired miranium in one of the arms companies, and then leave to let resources accrue again. Higher level arms manufacturers open up new gear options for purchase, so it’s worth making these investments.
Don’t Do Inventory Management
This final note is a tip that some players may rightfully disagree with, but I’ll give you my reasons.
Xenoblade Chronicles X has a seemingly endless supply of weapons, armor, strange alien artifacts, plant pieces, animal body parts, and more for you to collect. You can sell a lot of it, but just don’t.
Here’s why.
First, with rare exceptions, it’s not worth it. Most items can only be sold for a paltry sum. Using the waiting method I described above for acquiring money, along with regular expansions of your data point network, should get you all the cash you need, without the need to wade through the ever-growing inventory.
Selling items in your inventory takes time, and there are lots of other more fruitful ways to spend your time in the game.
Perhaps most importantly, many items you acquire are used in later missions. For instance, certain basic missions require that you equip a particular weapon. Other missions might demand that you find 10 of a particular plant. If you’ve sold those items, you’ll just have to find them again.
Finally, many items found out in the world can be turned in on your “Collectopedia” in your menu, which in turn sometimes nets you battle points are hidden rewards – a far more fruitful use of those items than getting a little extra cash.
If for some strange reason you love inventory management, and you really want to learn what each item is and whether it’s safe to sell, more power to you. But given Xenoblade Chronicles already significant grind, I’d suggest your time is better spent in other aspects of the game.
Get out there and enjoy exploring Mira!

Popular Content


Get the Game Informer Print Edition!
Explore your favorite games in premium print format, delivered to your door.
- 10 issues per year
- Only $4.80 per issue
- Full digital magazine archive access
- Since 1991