Tips And Info For Gears of War: Judgment’s OverRun Classes

When Gears of War: Judgment releases next year, Epic expects fans of the franchise to flock to the new OverRun multiplayer mode. After getting a chance to play the mode extensively (INCLUDE LINK) during our trip to the studio, we came away expecting the same thing. With its numerous classes and countless strategic opportunities, OverRun is sure to be a destination mode for fans of multiplayer. We may have a long time to wait before its early 2013 release, but there’s no harm in formulating your strategy a bit early. Read on to learn about Judgment’s COG and Locust classes, with expert “Q-Tips” from Epic’s multiplayer designer Quinn DelHoyo.
COG

Engineer - Damon Baird
Weapons: Gnasher and Blowtorch
Baird comes equipped with a sentry turret, which can be deployed near fortifications for an extra line of defense. If Tickers are causing trouble for your fences, the engineer’s blowtorch will get them back into top shape. An essential class if you plan on keeping your fortifications up for any significant amount of time.
Q-Tip: Are enemy Grenadiers throwing frag grenades at your e-hole? Not a problem for the Mechanic’s sentry turret. Throw one down and watch it shoot those grenades out of the sky.

Soldier - Augustus Cole
Weapons: Lancer and Boomshot
If you tend to stay on the offense during rounds of multiplayer, the soldier class will make you feel right at home. Armed with a lancer and boomshot, Cole is great for sawing Grenadiers in half at close range or blowing up crowds of tickers at range. This class isn’t all about racking up a high kill count, however, as the ability to throw ammo crates can make him an important addition to the team effort.
Q-Tip: The soldier can be paired with an engineer to create a formidable defensive position. Toss the ammo crate next to a Mechanic as he repairs fortifications to give him infinite blowtorch fuel.

Scout - Garron Paduk
Weapons: Longshot and Snub Pistol
As the only COG class to have access to special elevated positions, the scout is the perfect pick if you want a better viewpoint of the enemy’s tactics. You’ll be able to make your team aware of which direction the Locust are headed, and your tag beacon ability will point out their exact locations to every fellow COG. Staying up high and sniping is a solid tactic, but be ready to call out to your medic and soldier teammates if you’re in need of a revive or more ammo.
Q-Tip: Increase your odds at getting that glorious headshot by using the tag beacon to line up shots on targets before they turn a corner. Surprise!!

Medic - Sofia Hendricks
Weapons: Lancer and Snub Pistol
Many multiplayer games feature weak medics who exist mainly for support purposes. While Judgment’s medic certainly helps the team effort with her stim gas and revive ability, she still packs the firepower of a lancer. Whether she’s healing the team in the midst of a firefight or unloading a few dozen rounds into a Grenadier, Sofia is a massive help to the COG cause in OverRun.
Q-Tip: Just because you’re a Medic doesn’t mean that you can’t be lethal. Make yourself hard to kill by preemptively deploying stim gas and do battle from within its healing fumes.
Head to page two for info on the Locust horde.
LOCUST
Ticker
Prepare to see plenty of these at the beginning of every OverRun round. With their natural speed and bonus dash ability, Tickers are great at reaching fortifications before the COG can even get into position. Judgment's Tickers combine the two versions from Gears of War 3's Beast mode, meaning they can eat away at fences as well as self-detonate. They may not feature anything in the way of armor, but they can do some serious damage to COG fences if there's a decent distraction elsewhere on the map.
Q-Tip: Tickers alone are highly effective against COG fortifications, but can become downright menacing when paired with a Grenadier escort. Tickers can eat grenades thrown by the Grenadier, thus doubling the explosive payload a Ticker deals. They can also be kicked over fortifications and even up into the roosts where only Scouts and Wretches can go.
Wretch
The most agile of the Locust horde, Wretches can hop over fortifications and climb obstacles that other classes can't. If an enemy scout is taking your buddies out from an elevated position, a Wretch is perfect for scampering up for a melee kill. With their scream ability, they're also great for causing distractions that can open the door for a Ticker rush.
Q-Tip: The Wretch is an agile agent of chaos best suited for guerilla combat, using hit and run tactics with his cringe-inducing scream. He can use perches to sneak by COG defenses to get behind enemy lines, and can also jump over fortifications. Hunting in pairs is a ruthless combination when two Wretches take turns “cringe-screaming” opponents.
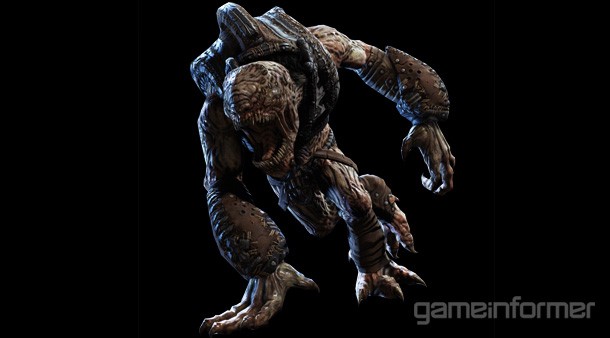
Grenadier
Locust creatures introduce some great variety to the typical Gears gameplay, but there's always an option for gamers that want to stick to the tried-and-true Lancer. Armed with the iconic rifle, a Gnasher shotgun, and frag grenades, this Locust is essentially a COG with nastier complexion. If you want to cause some serious trouble for the other team, ride a Bloodmount to regenerate grenades twice as fast.
Q-Tip: The vanguard of the Locust assault. Grenadiers are the most familiar to returning Gears players due to his Gnasher and Lancer. Use the engineer’s sentry turret power against itself by throwing a frag near a COG enemy standing within weapons range of the sentry. The sentry will target and destroy the grenade much quicker than if the frag detonated on its own.

Kantus
This shaman-like creature is essentially the medic of the Locust, with his chant ability supporting any teammate in range. He won't be of much help to the weak Tickers and Wretches, but he can be invaluable when supporting more menacing teammates like Corpsers and Maulers. If you feel like joining the fight on offense, the Kantus always has a Hammerburst at the ready.
Q-Tip: The Kantus’ heal chant ability automatically chains to other nearby Locust. Try to stay as close to the group as possible to maximize healing throughout the team.

Bloodmount
This Locust may have a melee attack, but he's far more focused on supporting the team than he is with dealing damage himself. When a Grenadier or Kantus is riding a Bloodmount, their ability cooldown doubles in speed. This means twice as many grenades, and much more frequent healing. Bloodmounts may not be the most glamorous of the Locust horde, but their support can come in handy if you need to double-down on abilities.
Q-Tip: Fast and menacing. The Bloodmount is now a full-fledged steed for players to ride on to terrorize the battlefield. Bloodmounts can act as transports to quickly get troops to the frontline as well as amplify the abilities of its rider. A Kantus rider healing while the Bloodmount bashes fortifications is a deadly recipe for success.
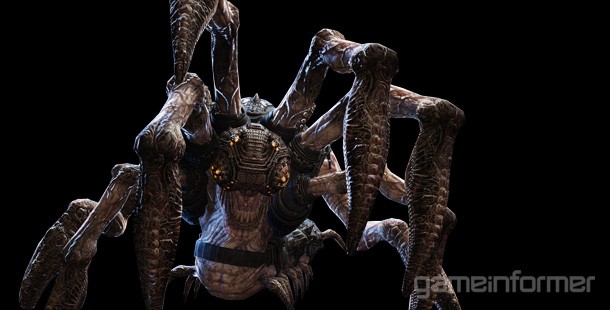
Corpser
This eight-legged beast is one of the most fearsome Locust in OverRun mode thanks to its burrow ability. Fortifications become non-issues, as the Corpser can easily bypass them while underground. Once your ability timer runs out, the Corpser re-emerges and is instantly ready to wreak havoc. Its armored legs offer protection from enemy attacks, and its numerous legs can hack away at objectives and COG soldiers. If you have a Kantus healing you during your assault, the Corpser becomes all the more dangerous.
Q-Tip: Use the Corpser’s burrow ability to subvert fortifications and emerge within melee range to rip and slash opponents to pieces. Also very useful as an escape tactic.

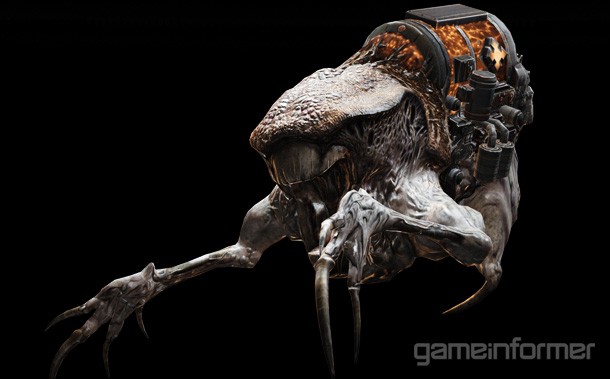
Serapede
If you're a COG soldier that's hoping to keep your fences in optimal condition, there aren't many sights worse than an invading Serapede. Considering it has to be attacked from the back side, it stays relatively safe when facing enemies head-on. Its ability allows it to rear up, giving it an elevated viewpoint of the battlefield. Once raised, the Serapede head can spit poison over fortifications and into enemy territory.
Q-Tip: The Serapede is only vulnerable to damage at its tail, so be sure to hug corners tight when attacking fortifications, forcing opponents to get within striking range of your electric mandibles. When paired with another Serapede, a devious trick is to overlap to protect each other’s vulnerable tail.

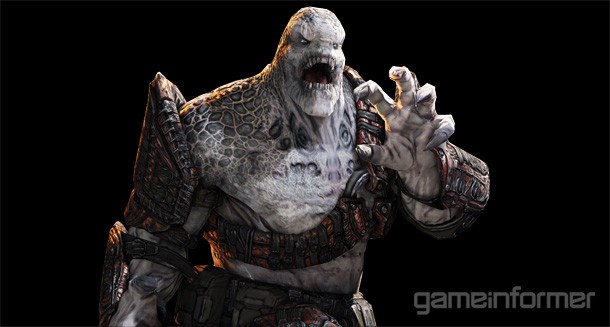
Mauler
If you feel like saving your points up for the most expensive Locust class, you'll be rewarded with the punishing Mauler. This hulking creature can reflect bullets back at COG, protect himself with his shield, and cause massive damage to fortifications, enemies, and objectives with his flail. Get a Kantus to heal a couple of these guys while they attack, and there's little that can stop you.
Q-Tip: Not only can the Mauler’s shield spin ability be used to reflect bullets back at any opponent, it can also slice ‘n’ dice anyone that gets too close.
In our hands-on time with OverRun, we discovered plenty of different strategies with these entertaining classes. Once Judgment releases, we're sure to see Gears' rabid community go wild with team tactics and new strategies that even Epic hasn't thought of yet. We may have spent a good eight or so hours with the mode during our visit to the studio, but we can't wait to get our hands on it again next year.

Popular Content


Get the Game Informer Print Edition!
Explore your favorite games in premium print format, delivered to your door.
- 10 issues per year
- Only $4.80 per issue
- Full digital magazine archive access
- Since 1991