Dark Souls For Beginners: Preparing To Die Less Often
If you've read my Dark Souls review, you know that I think this sadistic game is the hardest title I've ever played. It will punish you every time you give it the chance. But it's not impossible – far from it! – and there are actually many steps you can take to prepare yourself.
In particular, I'm trying to aim this guide toward players who are curious to try Dark Souls but didn't play Demon's Souls, the previous super-challenging action-RPG by From Software. However, even Demon's Souls experts might be able to learn a thing or two given how From has mixed up the formula this time around.
Also, I won't be going into any major spoilers, but I do have some location and boss names leading up to around the halfway point of the game on the final two pages. If you don't want any of that stuff ruined for you, maybe skip that portion of this post until you've sunk some time into the game blind.
Building the right character
As soon as you begin the game, you'll be thrown into a character-creation screen. One of the best parts of Dark Souls is that character building remains incredibly flexible throughout the game, no matter where you start, but you might as well as kick things off strong to make it easier on you.
You're immediately given the choice between 10 character classes. Note that your character class determines what stats and equipment you start out with, but it's not something you'll be locked into for the full game. If you start as a melee-focused class but decide you'd like to take up magic at some point, you can begin putting stat points into intelligence. If you begin as a sorcerer but realize you'd like to get holy, you can start upping your faith whenever you see fit.
That said, my recommendation for Dark Souls newcomers is to focus on a ranged class. Melee combat is incredibly fun, but it also tends to be much more challenging, since you're required to be up close and a single mistake will allow an enemy to drain your health fast. Fighting from a distance gives you that tiny bit more time to react, which may be just enough of an edge to help out someone new to the game. If you prefer bows, you can go with the hunter, but for magic I suggest the sorcerer. This build starts with the rather powerful early game spell Soul Arrow, which also has a handy 30 charges.
If you'd like a starting class that's able to switch between melee and spells a bit more, check out the pyromancer. This class's starting fireball spell only has eight charges, but the pyromancer also gets a hand axe and some solid melee fighting abilities. And if you're really just not interested in magic at all, I recommend trying the wanderer. This class has balanced starting stats and strong but light armor, allowing him or her to dodge enemies. Save heavy armor classes such as warrior and knight (or the no-armor class, the deprived) until you've got some experience with Dark Souls' precise combat.
The other major decision you must make at character creation is your starting gift. There are eight possible choices, but most of them are pretty unnecessary. For example, you could take the Blessing of the Goddess potion or Black Firebombs, but these are limited-use items that you'll be able to find plenty of in the world if you need them. The most immediately useful gift choice is the Master Key. This item will unlock many of the game's doors without needing to hunt down specific keys. It's also the only item that you cannot find in the game anywhere (although the Thief class begins with a Master Key in addition to whatever other gift they want).
Dark Souls director Hidetaka Miyazaki has actually suggested that players begin the game with the Pendant, a mysterious item that supposedly helps unlock something special in the game. As of yet, it's still unclear what the Pendant is used for, but early rumors suggest it's related to aligning yourself with one of the more hidden factions in the game. Choose it (or don't) at your own risk.

Relearning video game combat
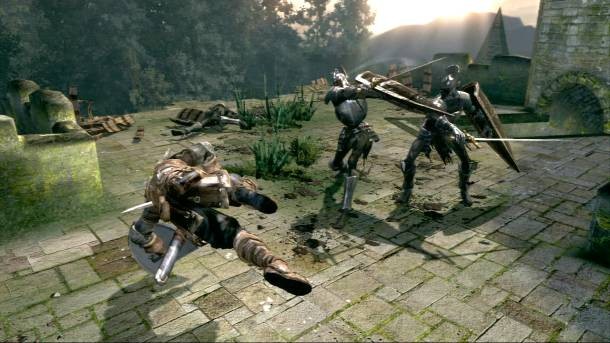
You know how in the average action game – Devil May Cry or God of War or what-have-you – you tap a couple of buttons and get to watch in awe as your character performs insane stunts of massive destruction? Dark Souls is not that kind of game. I wouldn't call the combat realistic, but it's much more deliberately paced than most games. With a sword, each button tap is one slow, steady swing, and once your character has entered the animation, you can't suddenly cancel it to roll away or block.
The first and most important thing you can do to improve your chances of survival is to always have your shield up – no matter what class or character type you are. If you're walking through a new area or taking on an enemy you're unfamiliar with, keeping your shield in front of you can be the difference between life and a quick, horrible death.
As with melee offense, defense in Dark Souls is all about managing your stamina meter. If an enemy hits you while your shield is up, you will lose an amount of your stamina meter equal to the amount of damage you avoided. Stamina is also used for swinging a weapon – regular swings take a tiny portion, while heavy attacks take a bigger chunk. Stamina is also necessary for dodging out of the way of attack, which will be a useful tactic against larger enemies and bosses.
If your stamina meter is drained entirely, your character will briefly be unable to block, attack, or dodge, though you can still move. If you're blocking some hits and your stamina meter seems low, sometimes it might be smarter to back off and let it regenerate. You'll also gain stamina slightly faster if you lower your shield.
If you played a melee character in Demon's Souls, you'll be pleased to discover that Dark Souls has several new tricks to master, but there's one move in particular that every character should learn: the plunging attack. If you tap the basic attack button (R1 on PlayStation 3, RB on Xbox 360) while falling onto an enemy, your character will lower his blade and do a massively damaging stabbing attack. This attack is key to defeating the game's first two bosses, and it makes many other encounters much easier if you remember to take advantage of it.
One major change from Demon's Souls is that magic use is no longer tied to an MP bar. Instead, each individual spell that you equip has a specific number of charges. You can recharge at bonfires, but this limitation encourages using multiple different spells and even mixing in some melee combat when necessary. Until you find NPCs who sell spells, magic-users must strategize about when to use the limited spell charges.
If this all sounds a little overwhelming, well, it probably will be for the first hour or two. Dark Souls' combat feels different from almost any other game. You'll never be able to get by just by mashing on the attack button, and no matter how many levels you grind out, even the early game enemies will always be able to kill you if you don't play smart. That said, combat is incredibly satisfying once you get used to it. Dark Souls is all about the rewarding feeling earned by overcoming its challenges, and that includes overcoming the challenge of a control scheme and combat philosophy that's not what we're used to these days.

Mastering humanity
In addition to the regular loot-gathering you'd expect, Dark Souls has two primary resources you need to manage: souls and humanity. Both are gained by attacking enemies (though humanity is very rare), and both can be spent at bonfires to power up in various ways. When you die, you will drop all of the souls and humanity you are currently carrying in a blood puddle on or near the spot you died. If you die again before getting back to that blood stain, the souls and humanity you dropped will be lost for good.
As in Demon's Souls, souls are spent buying items from NPCs and leveling up, which can only be accomplished at bonfires. When you level up, you can increase one stat, and in addition to that choice, your overall defensive abilities will increase naturally. Here's a quick rundown of the stats and what they affect:
Vitality – This stat affects your total health and is generally a smart idea to occasionally buff up, no matter what type of character you're playing.
Attunement – Attunement primarily increases the number of spell slots available, making it a necessity for magic-users. Frustratingly, you will not get a new spell slot for every point you put into attunement, so sometimes it will feel like you're “wasting” a level by putting a point into this stat. On the other hand, it also increases the likelihood of enemies dropping items, so there is a tiny bonus.
Endurance – The more points you have in endurance, the higher your stamina bar will grow. This stat also increases your resistance to bleeding and the total weight of items you can have equipped before your movement speed is affected. Melee-centric characters who want to equip heavier weapons and armor without sacrificing mobility will want to pump a lot of levels into endurance.
Strength – As you might expect, strength dictates the power of melee attacks, but in Dark Souls it also affects how quickly your character swings weapons. Many powerful weapons will come with a required amount of strength if you want to use them to full effect.
Dexterity – Like strength, many items will have a dexterity requirement, though these will generally be lighter weapons and bows. Upping your dexterity also introduces some surprises, such as changing your character's roll into an awesome backflip.
Resistance – This is the pure defense stat that determines how much damage you'll take when an enemy successfully attacks you. Defense will go up naturally as you level up, but if you're a tanking character, you can also put separate points into resistance to raise it even further. Resistance also increases a character's natural ability to resist being poisoned.
Intelligence – This one's for the magic users. Increasing intelligence will raise the damage done by any sorcery spells as well as improving the ability for characters to resist being cursed.
Faith – Faith functions similarly to intelligence but for players who use miracles. The more faith you have, the better you'll be at casting holy spells. Faith also increases magic defense.
Beyond leveling up swiftly and smartly, players will need to figure out the best times to spend humanity. To understand this resource, first you have to realize that you actually begin the game undead -- that's right, Dark Souls kills you before you even start. If you sacrifice one humanity at a bonfire, your character can revive to human form, but every time you die you will revert to undead until you spend another humanity. If you give up one more humanity from there, you can kindle the bonfire, which permanently increases the number of estus flasks (healing potions) that you are given at that bonfire.
Speaking of estus flasks, this will be the primary means of healing for players who don’t learn miracles. Unlike Demon’s Souls (or most RPGs, for that matter), you cannot collect healing items. Instead, you get a set number of flasks that are refilled every time you visit a bonfire. This is a double-edged sword. On the one hand, you must carefully manage when you choose to heal, as you always have a limited number of healing items. On the other, you’ll never run out for good, and it’s not possible to cheese your way through a tough encounter by jamming down a ton of healing items.
There are benefits to playing in both undead and human form. If you're undead, you cannot be invaded by other players, but you also cannot call on other players for co-op help. Even if you're not looking to team up with online players, many areas have symbols allowing you to summon an NPC to help you take down bosses, but this can only be accomplished in human form. NPCs that you run across in the world may also react differently to you depending on whether or not you’re in human or undead form.
As mentioned above, you can also only kindle bonfires when in human form. Since bonfires act as checkpoints that you respawn from, it might be worth it to save up humanity until you reach a new bonfire, ensuring that you have at least 10 healing potions at each checkpoint.
Finding your way
Where Demon's Souls featured a simple hub level from which you could choose multiple worlds to progress through, Dark Souls has embraced an open-world design. As I mentioned in my review, this leads to a world that feels much more real and complete, but it also makes it much easier to get lost.
I’m not going to cover everything you can do or that might happen to you along the way, but here are some tips for finding your way through the first 50 percent or so of the game:
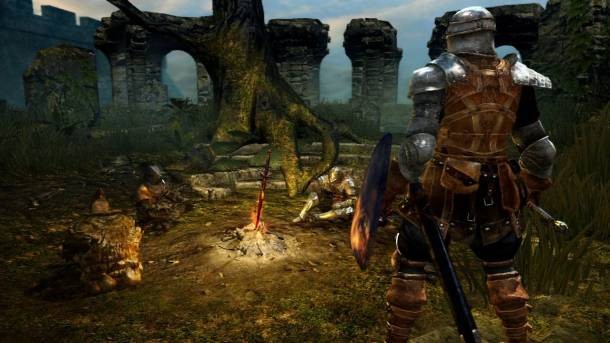
-After the tutorial, you'll find yourself in Firelink Shrine. The NPC near this bonfire will give you your first simple mission: Ring a bell in the church and a bell in Blighttown to make something happen. Before you take off from this area, check the ruins nearby to find a cleric NPC who will sell miracles and offer you entrance into the game's first covenant.
-Near the ruins you can find a graveyard full of powerful skeleton enemies. This path leads into the Catacombs, a high-level area that you should ignore right now. You can also find a path down the cliff near the bonfire in Firelink Shrine. This leads to the New Londo Ruins. While you're still too weak to handle the ghost enemies in this area, you can find a jailed NPC who will sell you a few sorcery spells and provide some basic blacksmithing.
-Work your way up the cliffs to enter the Undead Burg area. Here you'll fight through an army of weak undead enemies until you reach a bridge where you'll face the Taurus Demon. If you turn around after this boss appears, you can climb up the tower on the opposite side of the bridge. He'll eventually jump up to fight you, but not before giving you plenty of time to leap down and perform a powerful plunging attack on him.
-Beyond the Taurus Demon, you'll find another bridge where a dragon quickly takes up residence. This fearsome opponent will fill the bridge with fire, which helpfully takes out all of the undead there. When the fire has cleared, you can run across the bridge and duck into a stairwell halfway across, which will also have a shortcut to a nearby bonfire.
-As you progress, notice that you’re making your way under the bridge that the red dragon is on. If you’re trying melee (or just want an awesome sword in case you ever decide to go down that route), it’s worth taking time to stock up on arrows and shoot off the dragon’s tail, which hangs over the side of the bridge. You’ll probably need anywhere from 50 to 150 arrows, but you’ll score you an extremely powerful early game sword that also has surprisingly low stat requirements to wield. The only downside is that this sword eats through durability quickly, so be sure to repair it whenever you’re near a blacksmith. The video below provides a handy walkthrough for gaining this powerful weapon:
-And while we’re on that topic, YouTube user EpicNameBro has been posting a series of very helpful guide videos using the Japanese release of Dark Souls. Check them out if you need some extra help.
-Inside the church area, you’ll find a number of powerful enemies. Before heading inside, take the bridge in the opposite direction nearby to find a bonfire and another blacksmith. Once you've cleared the enemies inside the church, look on the altar to discover a fire keeper’s soul. This powerful item can be used immediately to gain a large number of souls, but it's smarter to hold on to it for a bit. Take the nearby elevator to open up a shortcut back to Firelink Shrine. Walk down the path alongside the cliff near the bonfire here and look behind the bar to see this bonfire’s “Fire Keeper.” Give her the fire keeper’s soul to permanently increase the healing power of your estus flasks.
-Once you make your way through the church, you'll fight a gargoyle boss on the roof. This guy isn't tough on his own, but once he's down to about half health a second gargoyle appears to spit fire at you. If you need help, I strongly suggest heading here as a human. Outside the entrance to the boss area, you should find a summon sign allowing you to call an NPC to help out. The NPC will usually do enough damage to keep the boss focused on him, which makes things much easier. You can also look around for summon signs from other players who are playing online.
-After destroying the gargoyles, you can ring the bell in the church's bell tower. An NPC will appear on the lower level of the tower offering you a few PvP-related items as well as the ability to leave any covenant you've joined.
-Destroying the gargoyles also wins you a key that will open a door just before the bridge the dragon is on. This leads down to the Depths, where you'll need to fight the Capra Demon, one of the most difficult early game bosses. This guy has a very large weapon, fast movement, and two canine allies – all in a tiny space that doesn't leave you a lot of room for maneuvering. The best strategy is to enter the room, immediately run past the boss and his dogs and up the set of stairs behind them, and then take the dogs out. Once they're gone, you should have an easier time of gaining your footing and taking this jerk out. This can take a lot of tries to get right, so don’t lose patience.
-The Capra Demon will drop a key letting you enter the sewers. Head down the path outside the room the boss was in, and on your way to the sewers be sure to head up and open the shortcut back to Firelink Shrine. You’ll also discover a new NPC in this area who sells poison and curse-healing items. This is fair warning: In the sewers, you’ll run into strange frog-looking creatures who can curse you. Getting cursed is one of the worst things possible in this game. Not only will it instantly kill you, but when you resurrect you’ll be stuck at half health until you find an item or NPC to heal the curse. This effect can stack, potentially reducing your health to the point where it’s virtually impossible to proceed. In other words, be very careful around these frog creatures. Take them out with ranged attacks if at all possible, and go heal your curse immediately if you’re unlucky enough to get one.
-Beyond the potential of being cursed, there are a few major traps to watch out for in the sewers. There are slime monsters crawling around on the ceiling that will drop down onto your head and drain a good chunk of your health before detaching if you aren’t careful. While you’re looking up to watch out for these guys, you’ll also need to keep your eyes on the ground to watch out for holes in the floor. None of these falls lead to instant death, but they can take you considerably off the beaten path. You’ll also want to watch out for two powerful enemies: the butcher and the giant rat. The butcher is easy enough to beat with simple dodging tactics; just be warned that you’ll take massive damage if a single swing hits you. If you’re having trouble with the giant rat, try backing into one of the tinier passageways nearby that it can’t fit into.
-Before leaving the sewers, you’ll need to take on the gaping dragon, one of the biggest and most impressive bosses in Dark Souls. Don’t let this creature’s size and gross appearance intimidate you too much. It actually follows some rather simple patterns that are easy to avoid, particularly if you stick to ranged attacks. If you need a little extra help, you should be able to find a couple of summon symbols outside the boss room when in human form. These NPC allies will essentially act as tanks, distracting the dragon while you do damage.
-After defeating the gaping dragon, you’ll get a key to unlock a door that leads to Blighttown. As the name suggests, you’ll want to head into this dangerous area carrying a lot of poison-healing items or, if possible, the Cure spell. In Dark Souls, whenever an enemy hits you with an attack that has a poison element, a small bar will build up. The speed at which this grows is based off your poison resistance stat. Once the bar is full, you’ll be poisoned, at which point your health will drain until the bar empties or until you die (the latter of which is more likely to happen first unless you heal the poison).
-If you enter Blighttown from the sewers, you’ll begin in some rickety platforms high above the ground. Carefully work your way down avoiding the dogs, trolls, and bugs that make up the main enemies in this area. Eventually you should make your way to the bottom, a murky swamp area. While walking in the swamp, your character movement will be slowed and you will be poisoned. Like I said, you need the ability to heal poison in this area.
-On the swamp floor, you can find a bonfire hidden off to one side. From there, push through the swamp until you find a rocky area guarded by a few giant trolls wielding huge boulders. These enemies are very difficult to fight, especially in the movement-slowing swamp water, so if possible try to sneak around them, leaving a wide berth. Past the trolls, you’ll enter a webbed cave that leads to a boss encounter with Chaos Witch Quelaag. As with many of the bosses, you can summon an NPC to help you before the fight if you’re in human form.
-Beyond Quelaag you can ring the second bell, after which you’ll be treated to a cutscene of a large gate being opened by giants. This is Sen’s Fortress. To reach this level, you’ll need to book it out of Blighttown. You can find a shortcut to the surface near the bonfire before Quelaag that will lead to the New Londo Ruins, then to Firelink Shore. From there, head back up to the church and to the bonfire above the blacksmith near there. The entrance to Sen’s Fortress is located across from that bonfire.
-Sen’s Fortress is going to take you a while to get through. There’s no getting past that. This place is full of insane death traps and the hardest enemies you’ve faced in the game so far. If you want to see a full run-through, check out the Reiner and Phil video on Dark Souls where I show off how to get through the whole area. Be sure to keep your shield up in preparation for dart traps and watch out for giant boulders flying through the area.
-When you get to the roof of Sen’s Fortress, be careful: There is a giant who will toss flaming boulders at you until you find and kill him. Near where you enter the roof area, you can find a spot where you can drop off the roof and onto a small ledge below that contains a bonfire. Do this! Once you activate this bonfire, you won’t need to run through the whole level every time you want to fight the boss. You can also find a locked cage in the roof area that will lower to the first level, making future trips through the fortress quick and painless.
-If you want to summon an NPC to help you fight the giant iron golem boss at the end of Sen’s Fortress, you’ll find the summoning sign hidden in a room across the bridge near the entrance to the boss area. If you’re taking on the boss on your own, be careful. You’re fighting in a relatively tiny area with no barriers, so it’s incredibly easy to roll off the edge of the roof and fall to your death. The best way to avoid the boss’s attacks is to roll toward his hammer swings – so if he winds up to swing to the right, roll in that direction.
-After the boss fight in Sen’s Fortress, you’ll be transported to Anor Londo. This is where I’ll leave you to begin discovering things on your own, but here’s one tip: Head onto the circular bit of ground opposite the entrance of the first bonfire in this area. This is actually an elevator that will take you down to a new walkway. Once you’ve killed the gargoyle here, look to your left. You should be able to find some scaffolding that leads from the platform you’re on all the way to a broken window on the building nearby. This is where you need to go. It’s incredibly easy to miss this path and become lost, but once you see it, you should be set.
Popular Content


Get the Game Informer Print Edition!
Explore your favorite games in premium print format, delivered to your door.
- 10 issues per year
- Only $4.80 per issue
- Full digital magazine archive access
- Since 1991